How to Run a Live Coding Stream on Twitch using OBS
If you’re reading this post, you might be interested in trying your hand at live coding on stream, as a way of sharing your projects in a more relatable, immediate way than a polished blog post, teaching others about programming, or just as a way to have fun. I think that live coding and streams in general are an interesting possible future form of both education and entertainment, and if you’re contemplating starting your own stream, I sincerely hope that you do it.
This month marks the 6 month anniversary of the first stream on LARGE DATA BANK, my Twitch live coding channel. It’s grown from a one-off Friday experiment into a regularly scheduled part of my life, a community of dozens of wonderful regular viewers and chatters, and an activity that’s one of the top things I look forward to doing every week.
I’ve learned a lot along the way, and this detailed guide to the way I’ve set up my stream is my attempt at stepping back and sharing those learnings in the hopes of inspiring others to try this awesome hobby for themselves. I hope it’s useful for you as you start your own journey into streaming.
If you have any questions that aren’t answered in this blog post, I’m more than happy to answer them on Twitter or elsewhere online.
Also, please send me a follow on Twitch and Twitter for stream notifications! I stream every Friday at 3 PM ET, and most Sundays at some time in the afternoon.
Intro
Whatever your reasons for wanting to try streaming, there’s quite a bit of setup that you’ll need to do up front to try it out that can feel daunting. Everyone has to go through this initial setup period, though, and so can you. You got this!
The most important part of this post is the section about OBS, which is the awesome, cross-platform, free and open source streaming software that most of the community uses. OBS will be your best friend on your streaming journey! You will use it to control your webcam, desktop, audio, and every other element that goes into the final product of your livestream.
The rest of the post focuses on configuration that’s more specific to Twitch. I like to use Twitch because I like the culture that’s developed there over time, but plenty of people think that YouTube Live is more appropriate for professional content. I’m not too familiar with YouTube Live, but most of the discussion about OBS should apply the same for YouTube as it does for Twitch: the main difference is that you’ll configure OBS to send to your YouTube account instead of Twitch in Stream settings.
Yo! If you’re trying to set up your very first stream, you really don’t need most of the stuff in this guide, which represents what I’ve built gradually over the past 6 months, stream by stream. My recommendation for the livecoding-curious is to try streaming with a bare-bones setup, to see how you like it, before investing in expensive gear or diving into hours of configuration and asset creation. You can accomplish this in several hours over a weekend. Set up a single scene in OBS with your captured desktop as the background and your webcam in the corner, with your microphone configured under Mic/Aux. That’s all you need: a simple setup for streaming your coding is now yours! I’ll cover how to make that happen below, in the OBS Configuration section. Just ignore most of the extra scenes and various bells and whistles, and you’ll be good to go.
OBS configuration
OBS is where you’ll produce everything that your viewers can see and hear on the live video, including your desktop, the camera with your beautiful face on it, your voice, and any stream alerts, overlays, text, or other information that you might want to show to your viewers.
There’s a lot to cover with OBS and I’m not going to try to explain all of it, so I’ll just talk about what’s worked for me. To make something that suits you, you’ll need to flex your creative muscles! You can use the ideas here as a starting place, but you’ll need to dive into OBS and play around: everyone’s setup is going to be different.
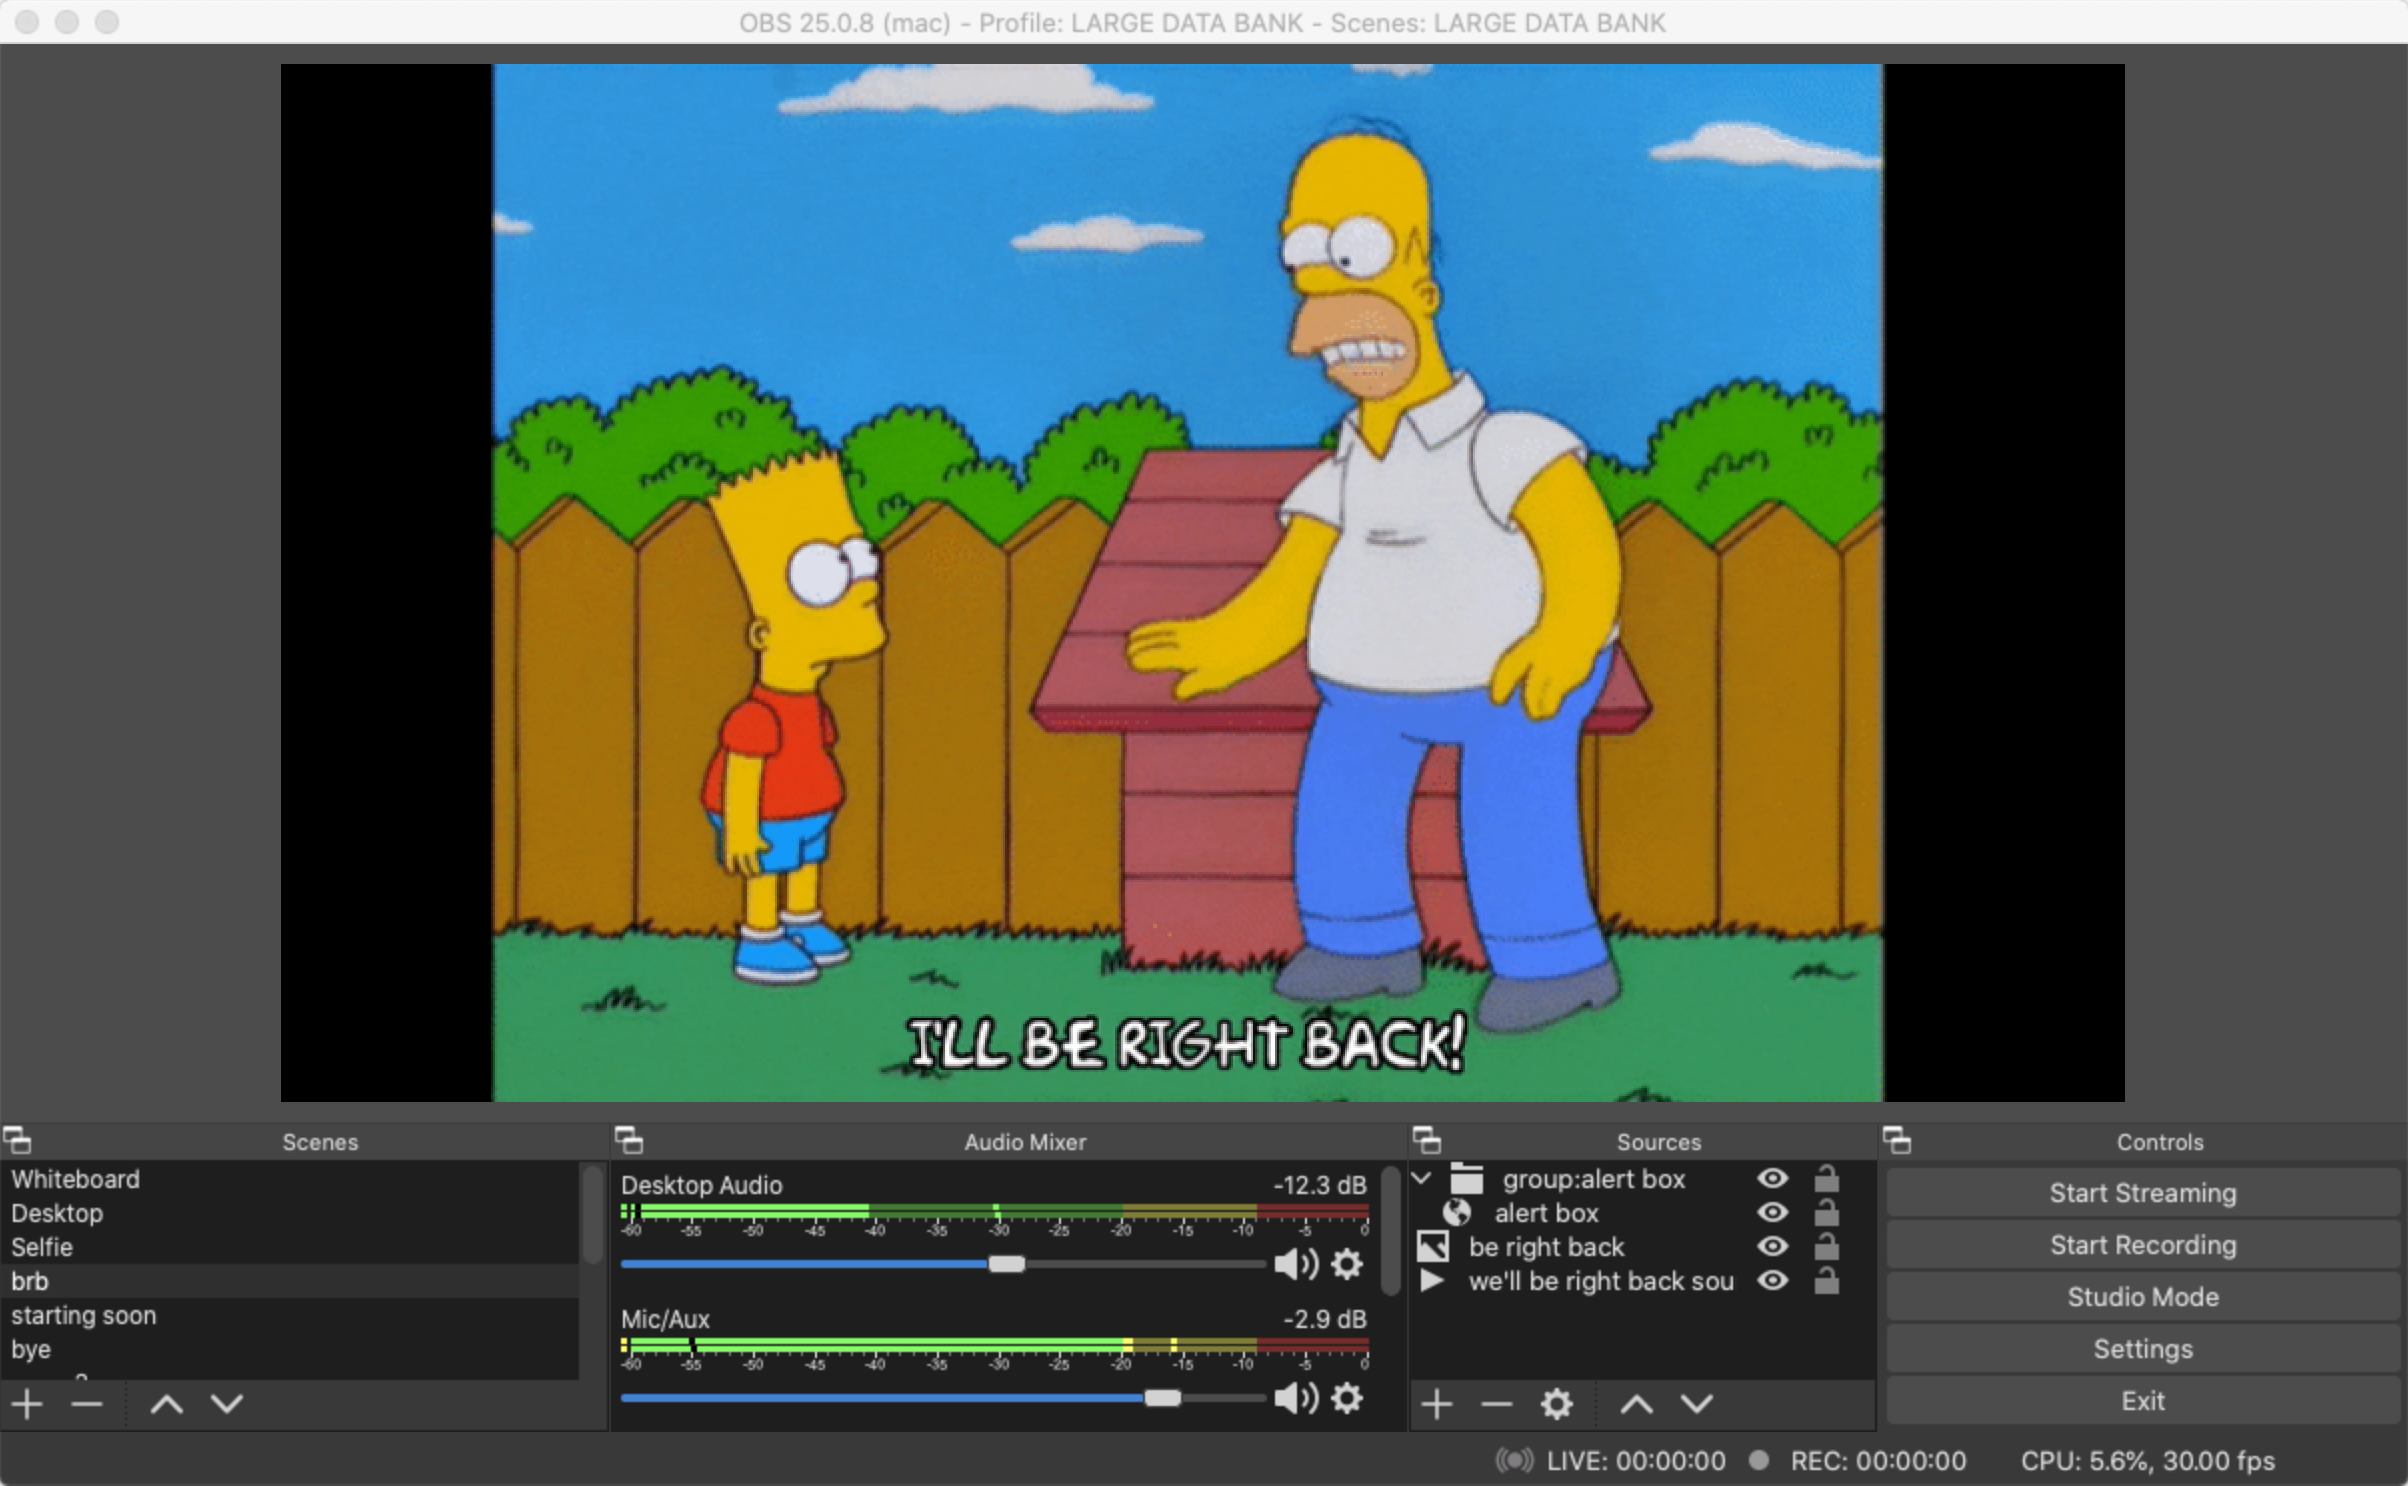
Scenes
A scene is OBS’s name for a particular layout of video and audio components on a stream. Typically, you’ll see Twitch streamers stay on a single scene for most of their stream: their game, desktop, or whatever their focus is. But it’s handy to have a few extra ones for the intro and outro to your stream, something that covers the screen for when you want to take a break, and so on.
I have the main scenes that I use bound to global hotkeys, so I can switch between them without having to click around in OBS. Unfortunately, sometimes the hotkeys stop working during the stream - I’ve yet to figure out exactly why this happens. If you happen to have this same problem and have found a workaround, please let me know!
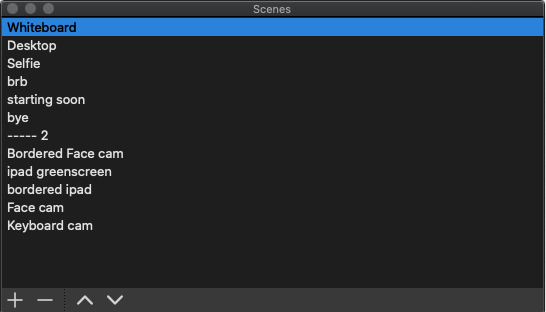
I have 6 primary scenes, and a couple of child scenes that are embedded in
several main scenes to deduplicate on-screen elements (the ones below the
----- in the picture). However, I spend the vast majority of my stream on one
of them: the Desktop scene.
Desktop
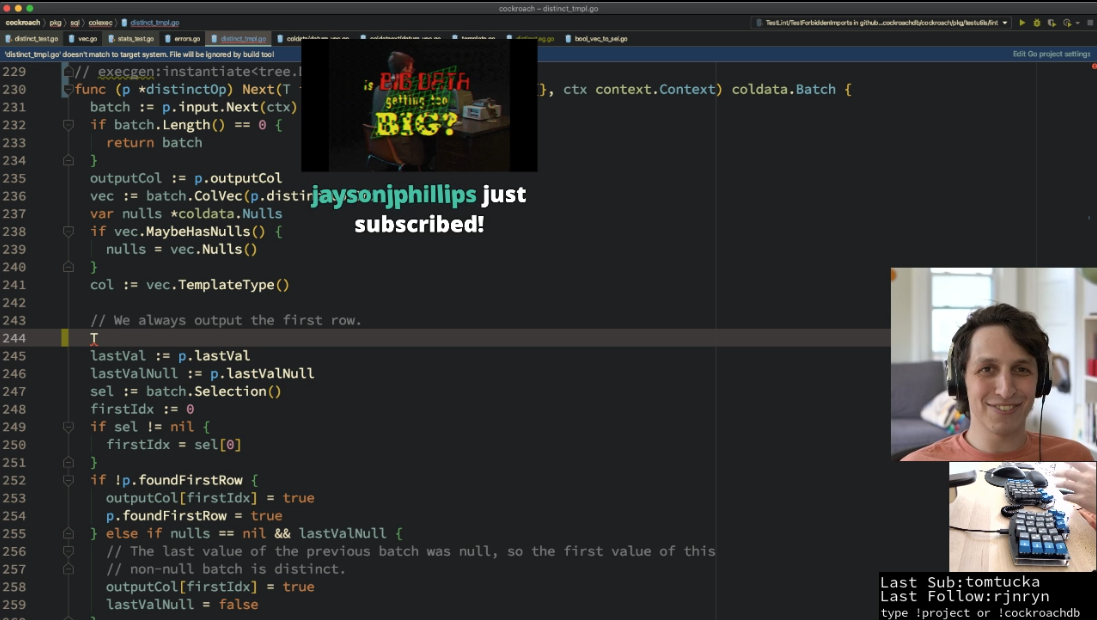
This scene is the workhorse of the stream, and the one that’s active 95% of the time. It consists of a full-screen, 1080p Display Capture source of my external monitor. This is convenient because it leaves no ambiguity about what’s catpured on the stream (it’s the whole monitor) and leaves my laptop screen free for the OBS window, monitoring chat, and anything else that I want to look at while streaming without having to show my viewers.
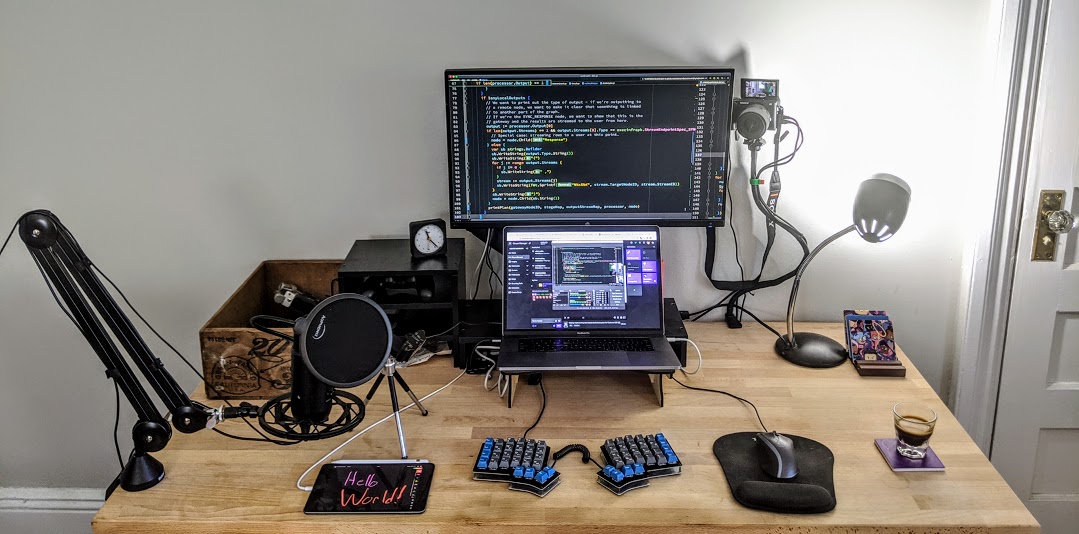
My Desktop setup post goes into more detail about the way that I’ve set up my desk to have two monitors. It’s so convenient for the stream that I’m hooked, and I’m not sure how I’d manage without.
A quick note on font size: you have to make your text editor font quite large to make it legible for your viewers! It will take a little while to get used to this. I use 26-point font in my editor, which provides only about 30 visible horizontal lines of code. This is next to nothing compared to the amount of context you’re probably used to seeing while programming. This hamstringing is worth it, though: the bigger your font, the more likely it is that your viewers will be able to follow along with what you’re doing, stay engaged, ask questions, learn, and have fun.
You should also try to remove as many distracting elements from your editor and desktop as possible while streaming, to keep the focus on the code. For me, this has meant disabling the Mac’s menubar and Dock, and removing the vast majority of toolbars from my IDE.
Besides the desktop capture source, which is at the back of the scene, I’ve added several other sources:
- Face cam, which is a video source from my capture card (more information about the video sources in the Video section)
- Keyboard cam, which is a video source from a webcam pointed at my keyboard.
- A couple of text boxes, to show my most recent subscriber, follower, and some on-stream commands. The text boxes are updated automatically by the StreamLabels app.
- A web page source connected to Streamlabs Stream Alerts, which I’ll cover below.
I definitely didn’t start with all of these elements - it’s quite a lot of work to tweak things just the way you want - but I’ve kept this configuration for the past couple of months and I like the way it looks.
Whiteboard
The whiteboard scene is meant to showcase my iPad full screen, allowing me to draw things on stream to demonstrate ideas or concepts. I use the Concepts app on the iPad along with an Apple Pencil for drawing, and it works pretty nicely.
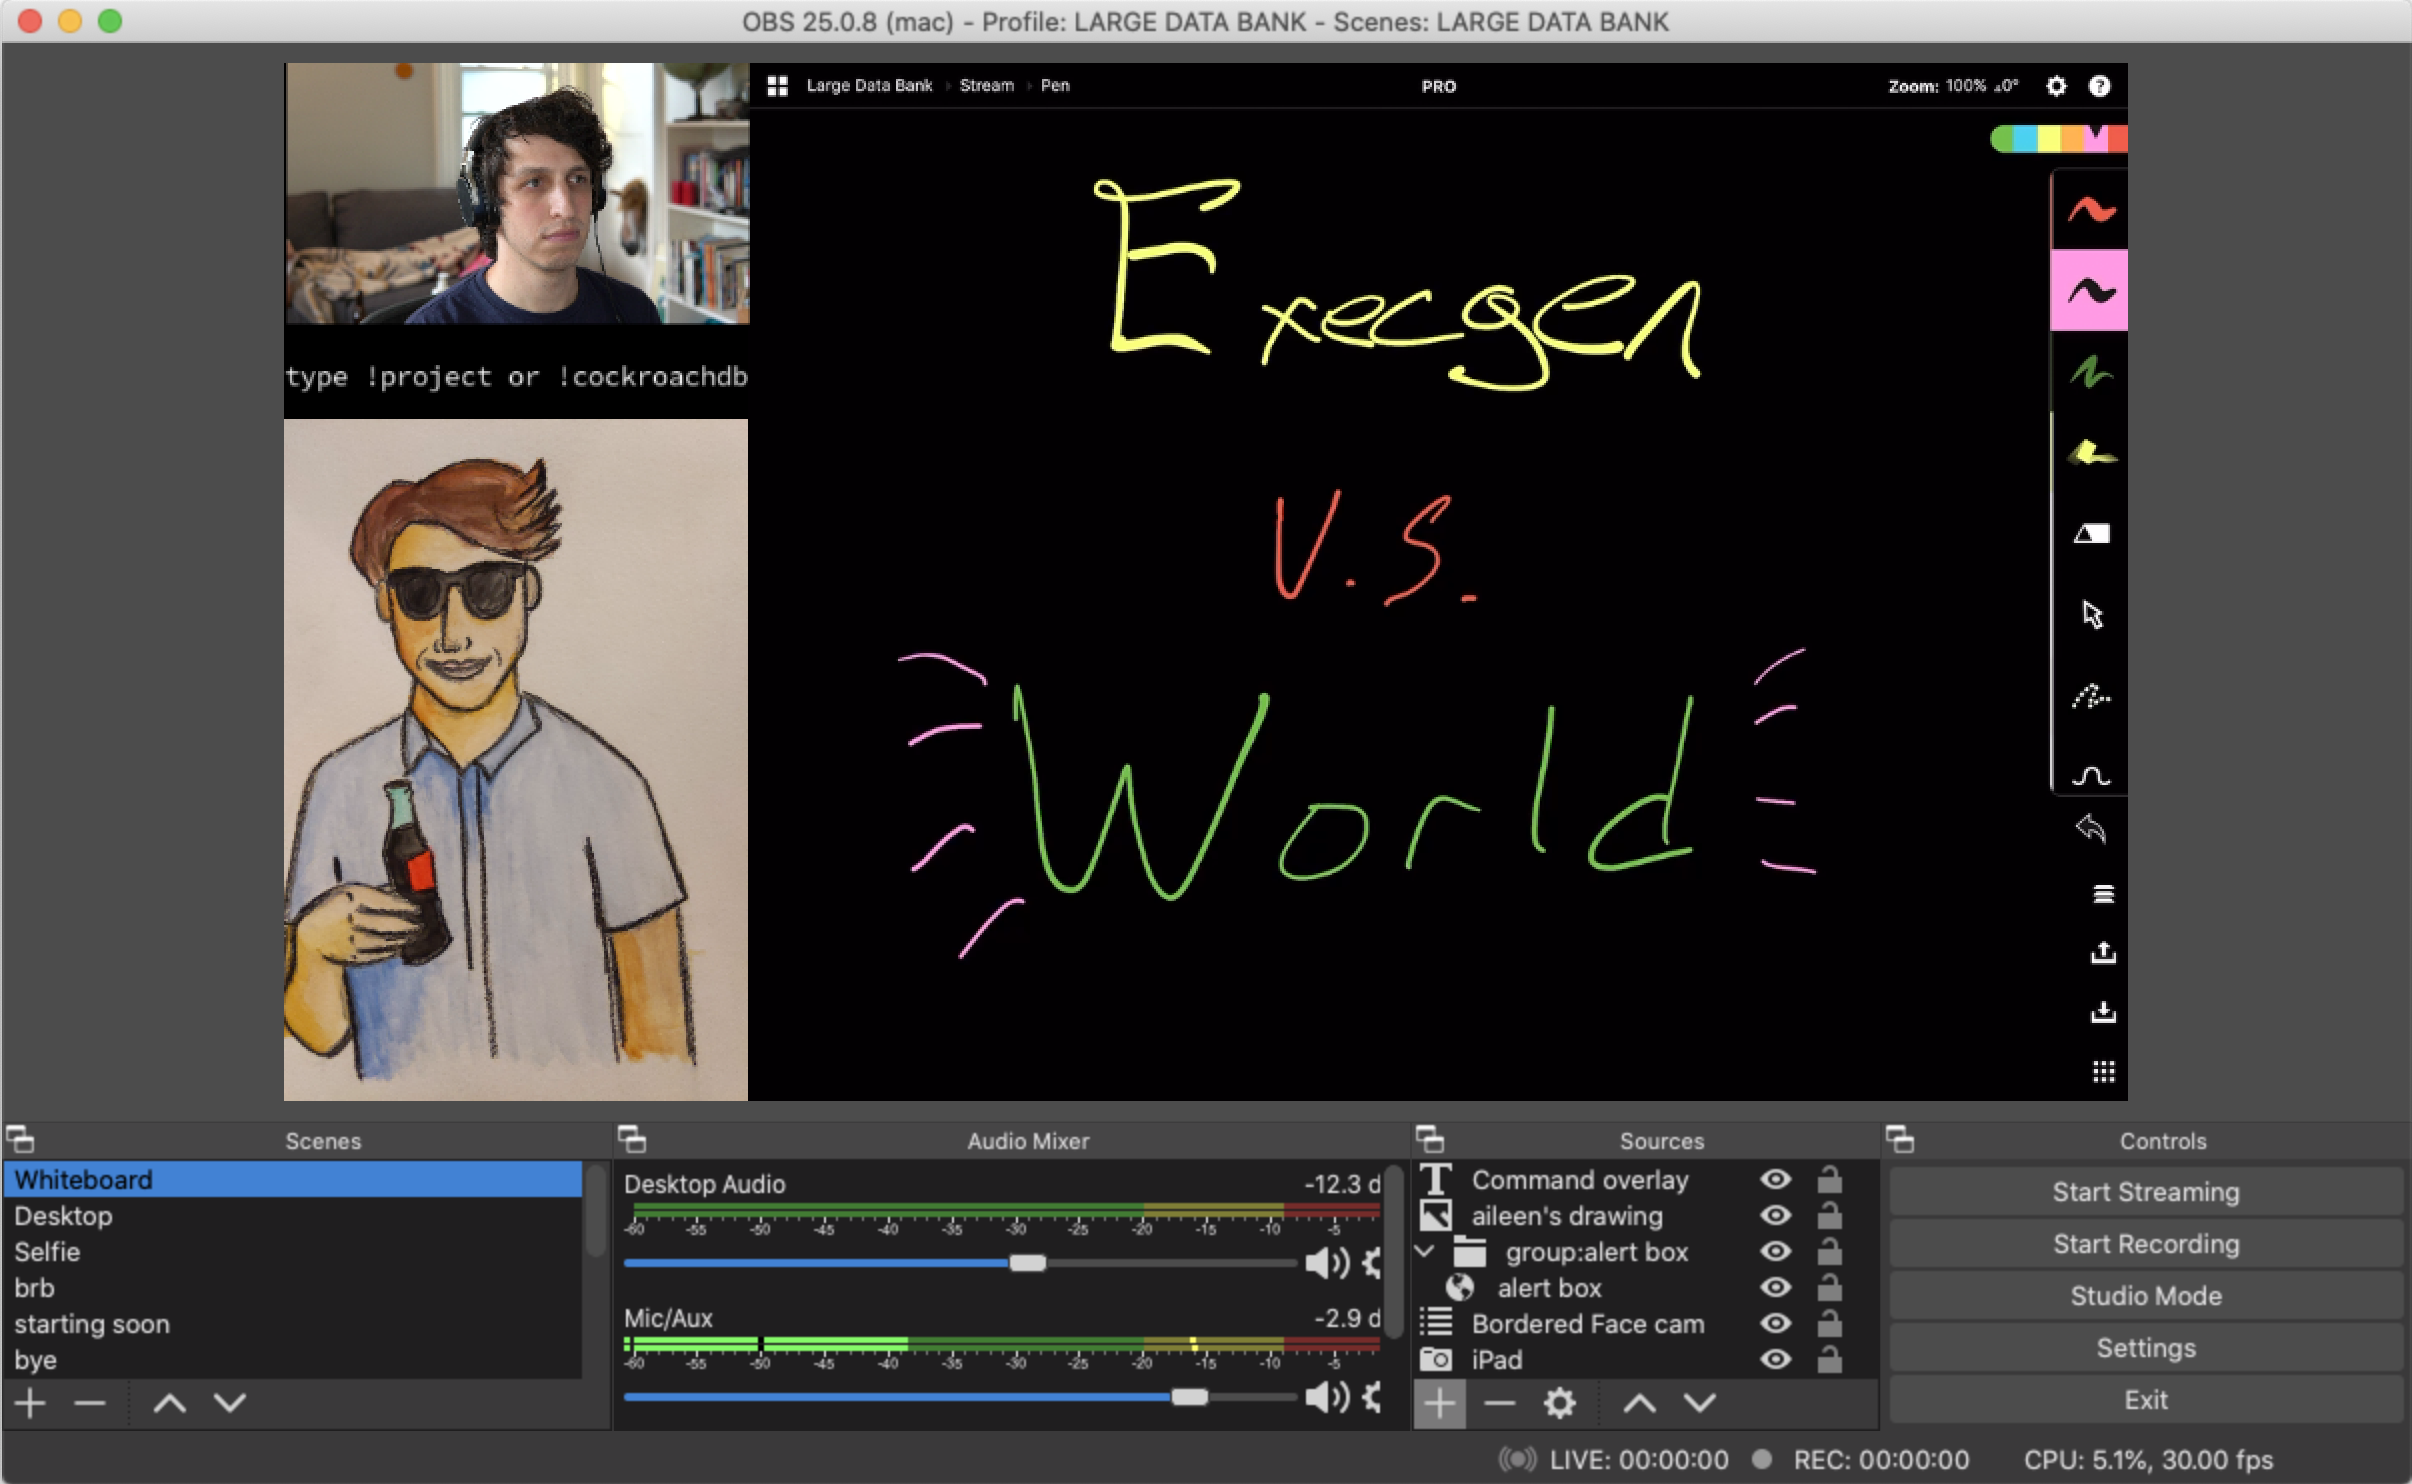
I didn’t know how to fill up the space on the bottom left, since the iPad doesn’t have a widescreen aspect ratio like my monitor does, so I put a picture that my friend Aileen drew of me to make the stream a bit more visually interesting!
This scene references the same facecam and alerts source as the Desktop scene. You can definitely use DRY principles in OBS, just like software - but it does get tricky to keep everything de-duplicated.
iPad Green Screen Overlay
I also set up a “green screen” configuration for the iPad that I can overlay over any other scene with a global hotkey. This gives me the ESPN football announcer effect during my stream: I can draw on my iPad, and the lines will appear overlayed on top of whatever else I have on stream at the time.
This is probably the most complex video element on my stream, but OBS makes it pretty simple to set up. I added a Color Key filter with a black background on top of the raw iPad video feed, set my drawing app to have a black background, and tweaked the Color Key settings in OBS until things looked right:
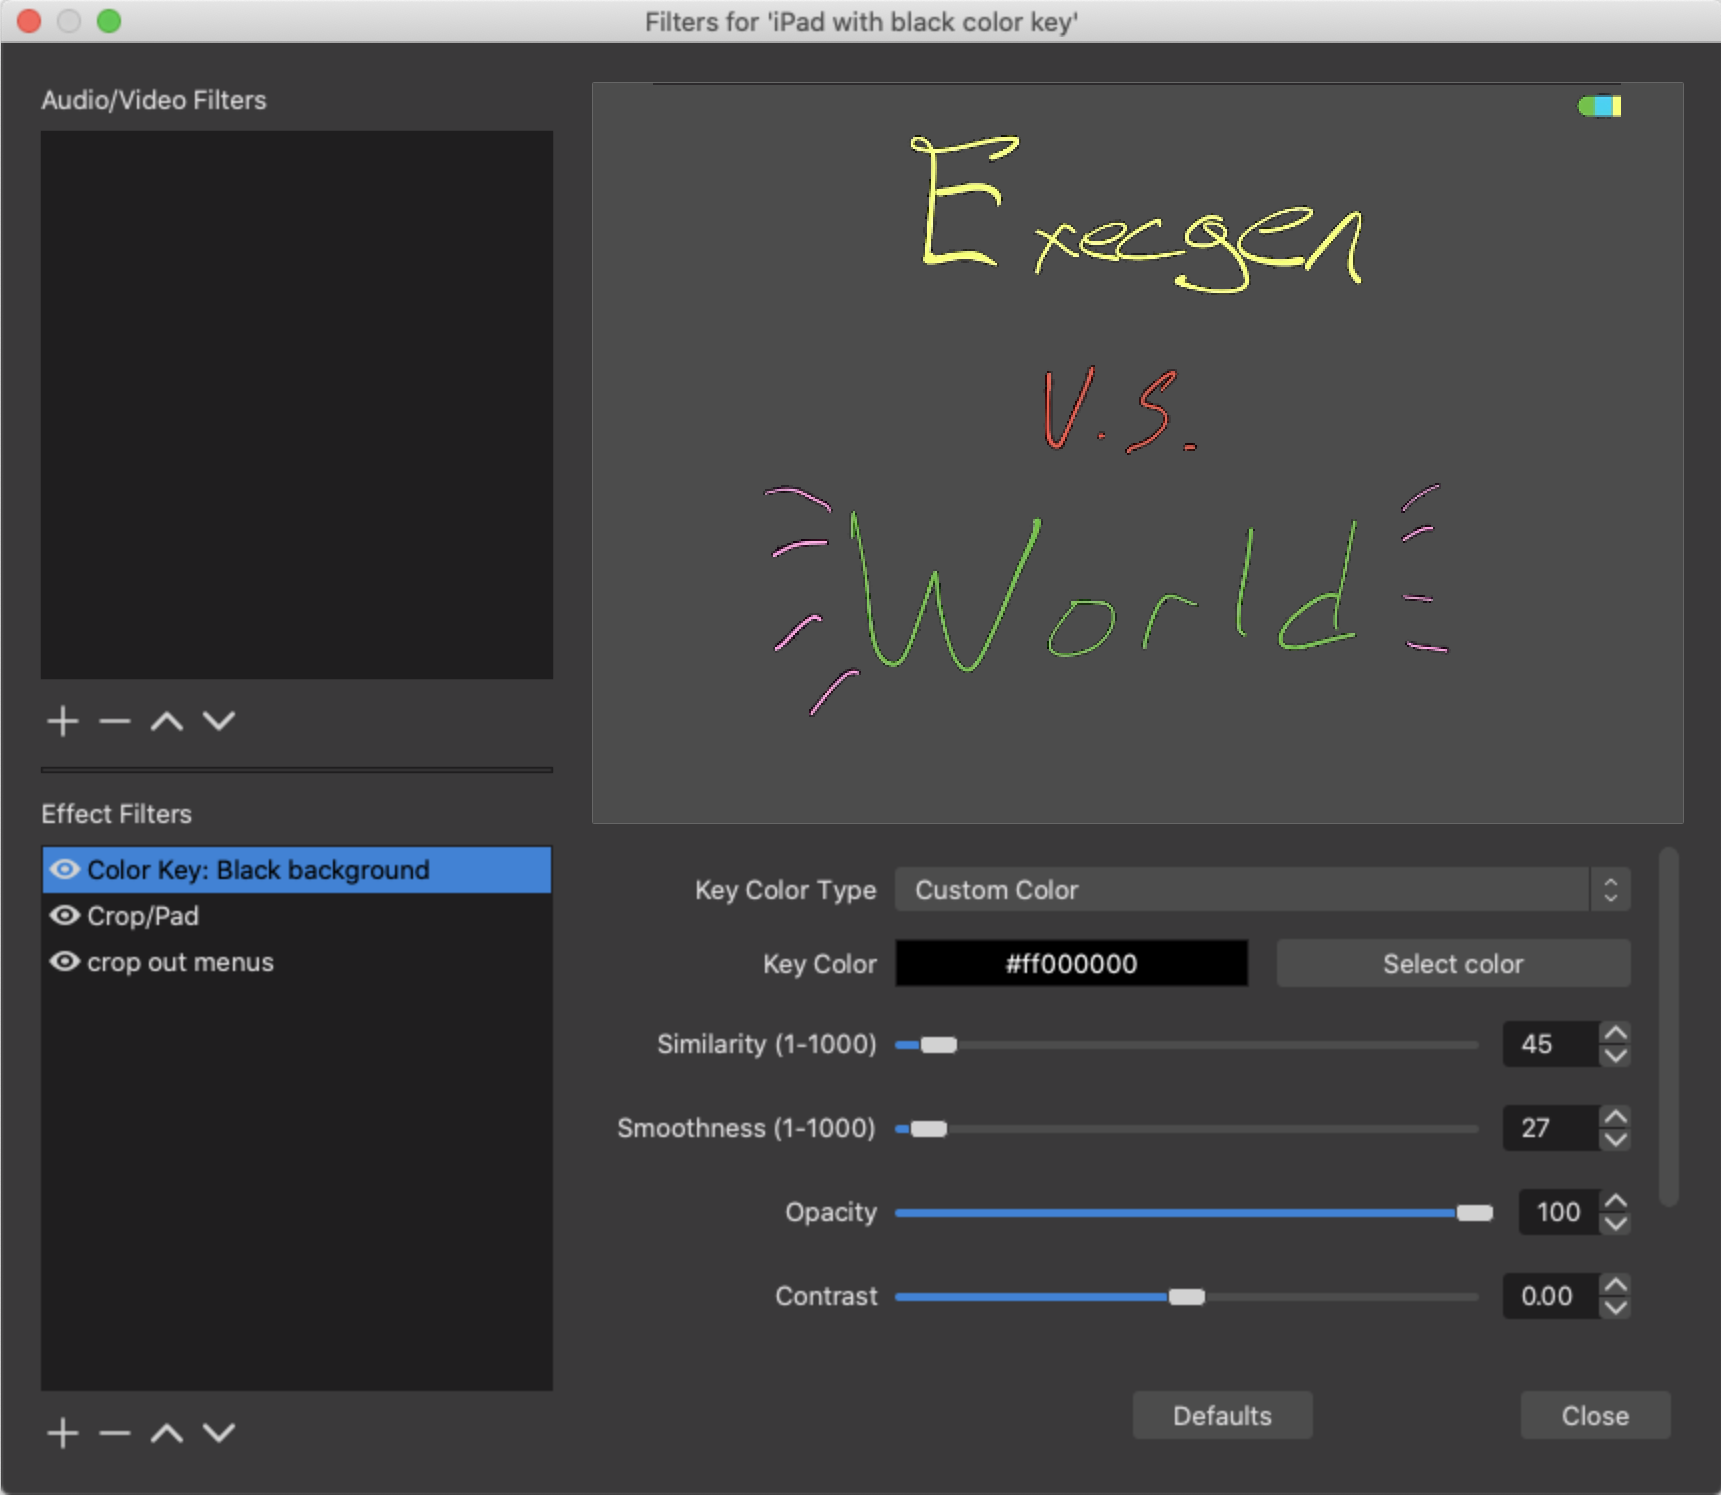
I don’t use this element as nearly as often as I’d like, but I think it’s pretty neat. I recorded a demo video of it if you’re curious for how it looks - I also use it occasionally on the stream.
Selfie
This is just a full-screen version of the facecam. I copied the name of the scene from @noopkat’s blog.
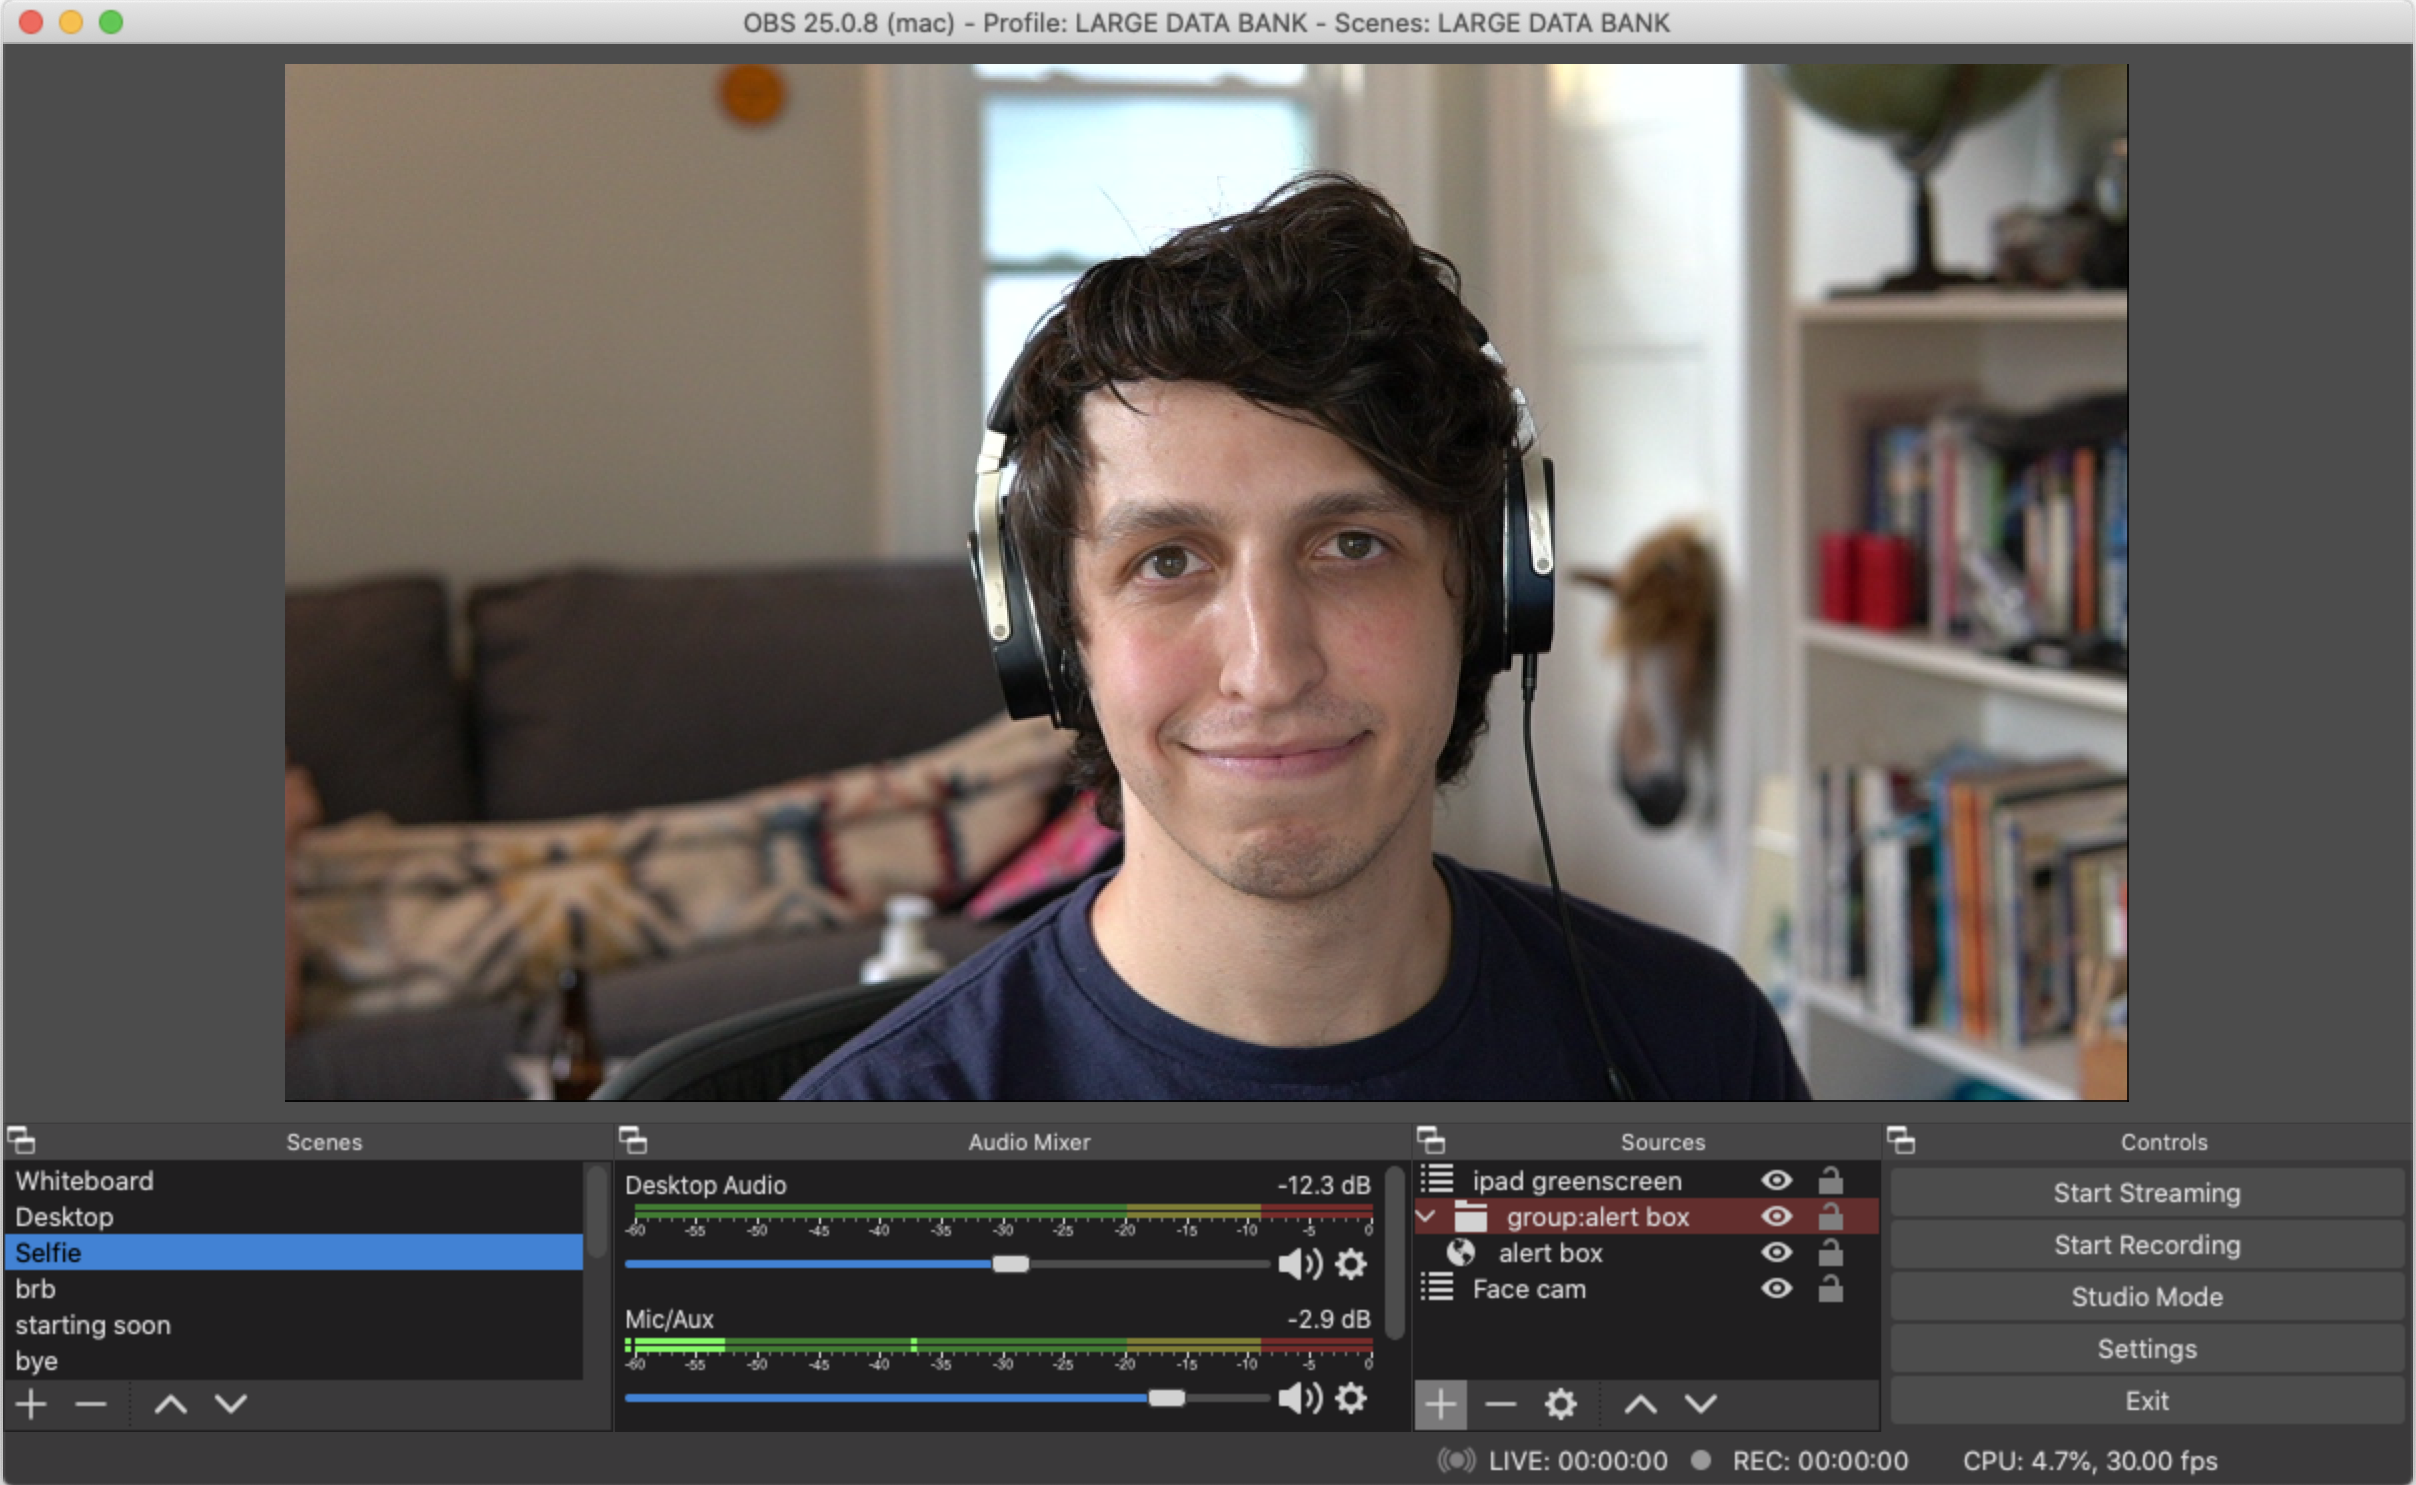
I use this scene for “turn to the camera” moments, which I find really fun. I’ll switch to the scene, look right at the camera, and talk for a bit before switching back to the desktop view.
Starting Soon
This scene goes on as soon as the stream turns on, until I’m ready to start talking to the camera. I’ll usually start the stream a few minutes before the time that I announced on Twitter for my stream, and leave it up until that time comes (with a muted mic!).
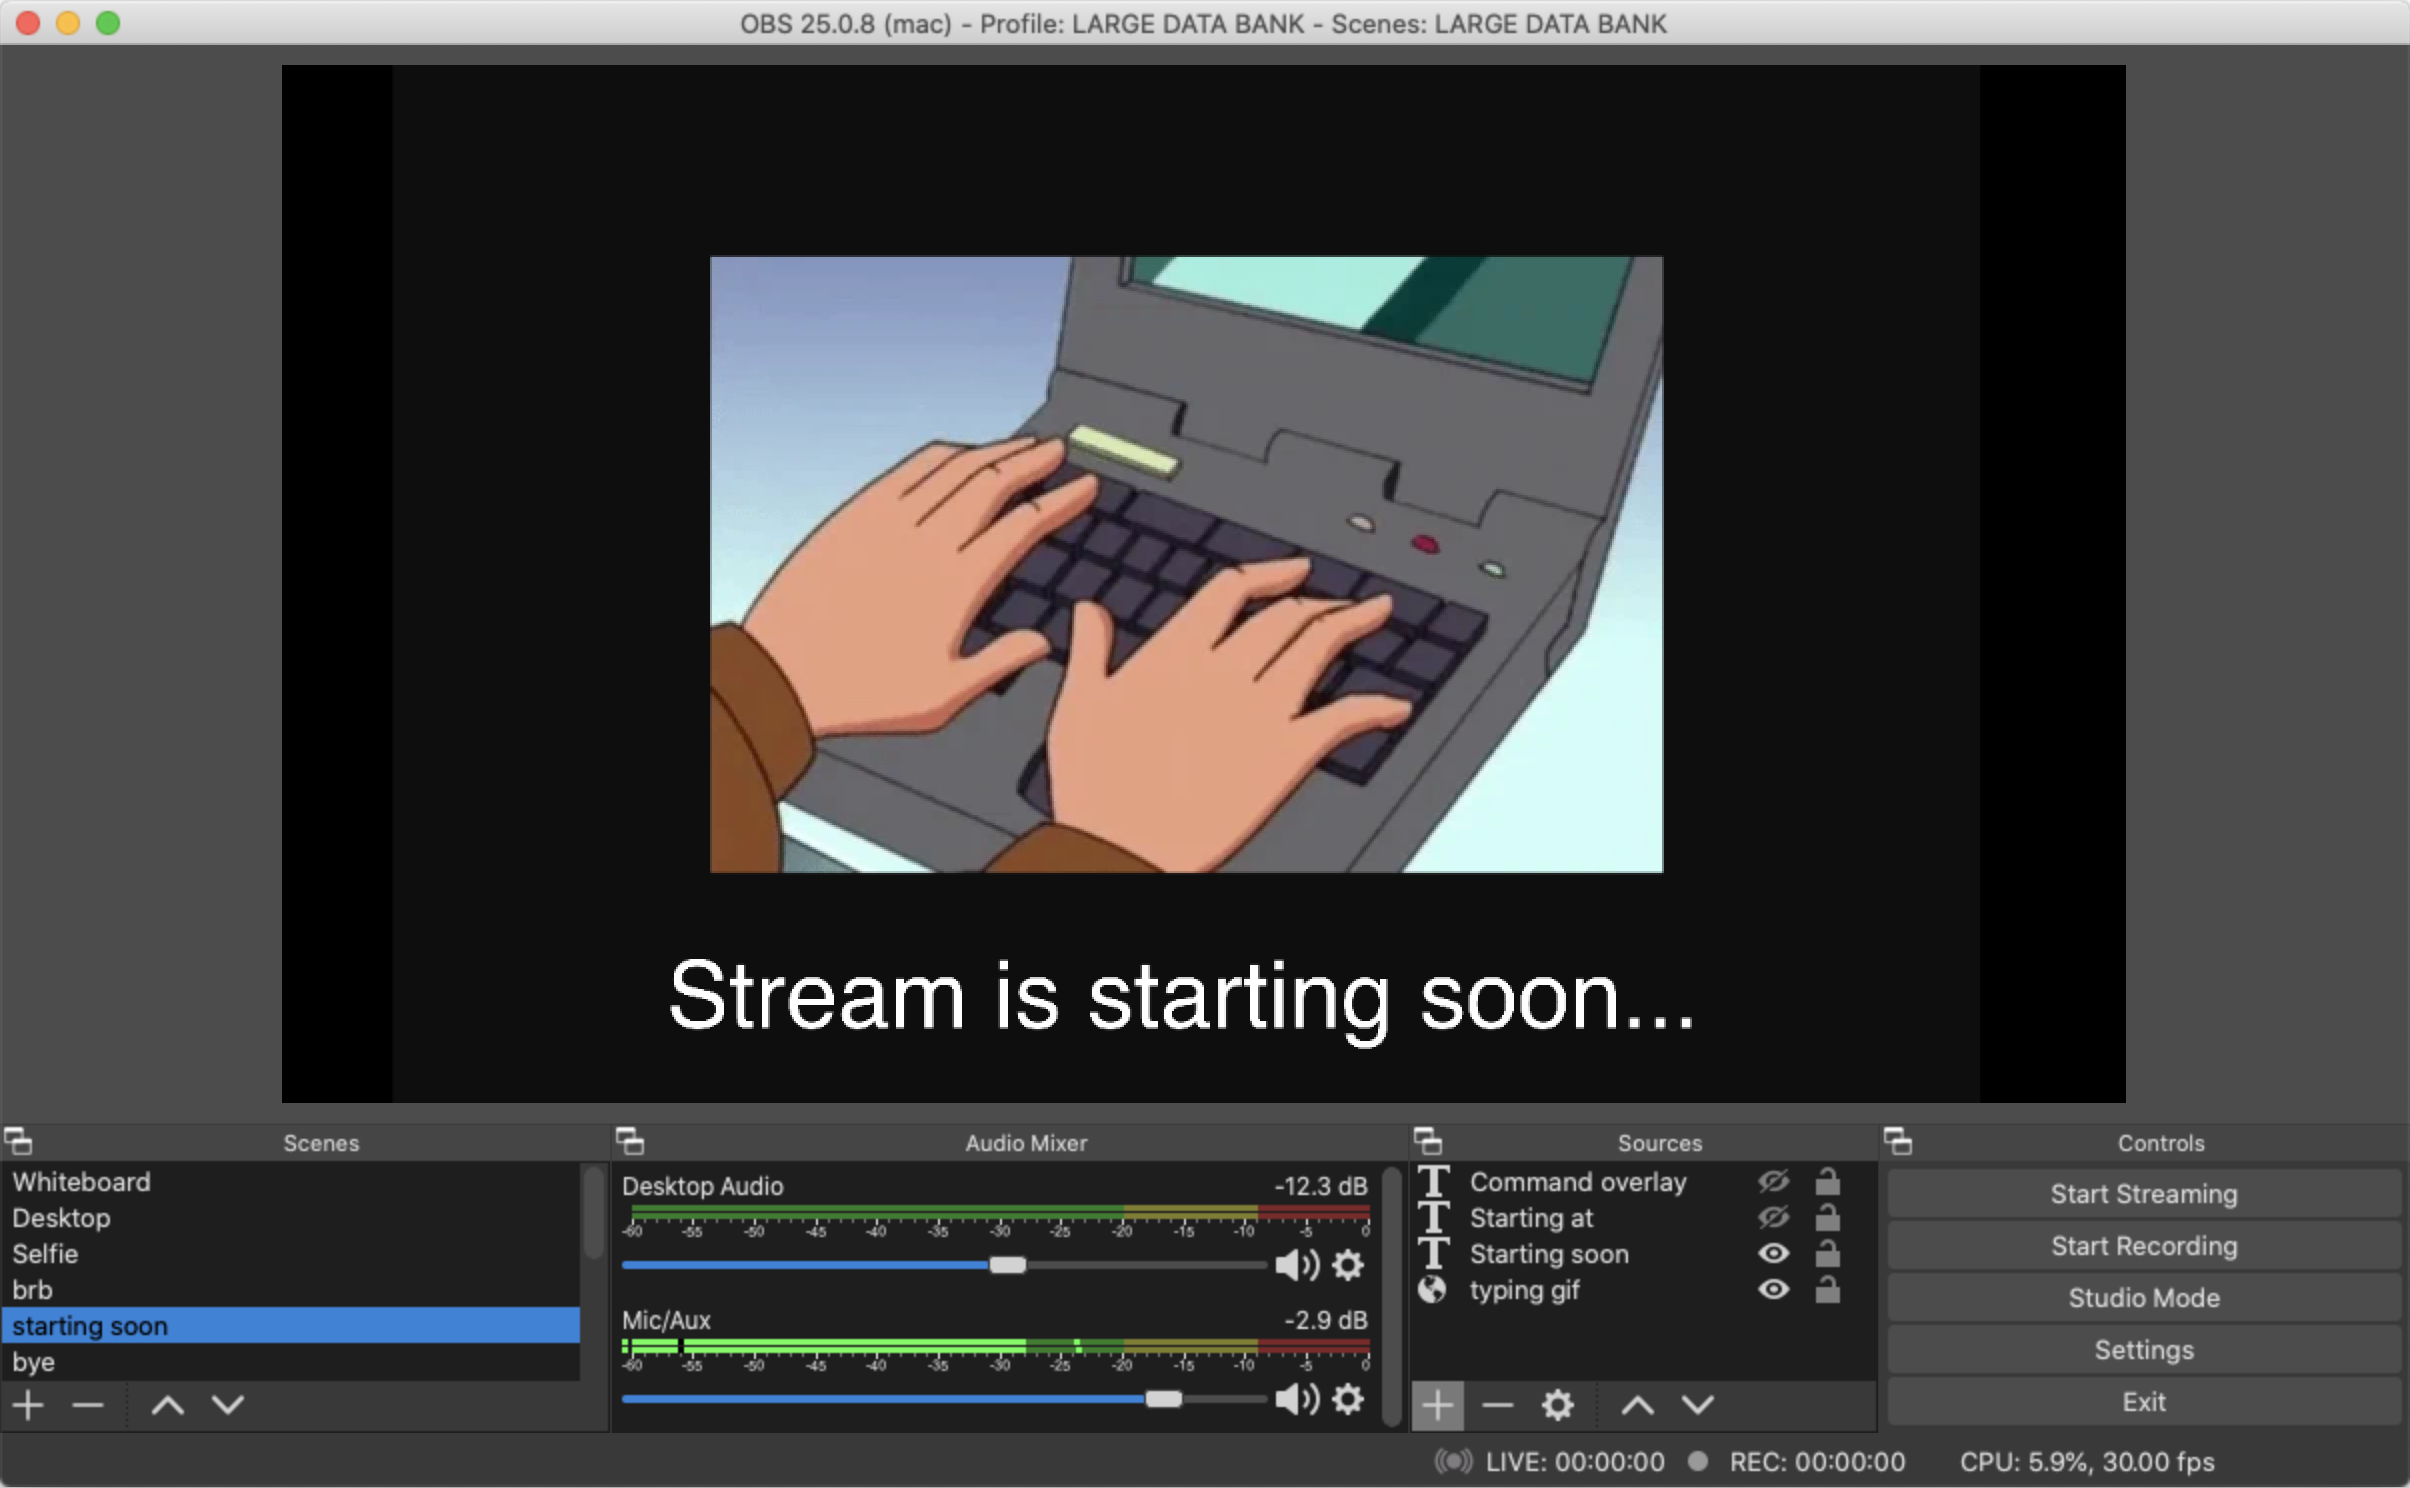
I used a gif I found on the internet of someone typing, so people can tell that the stream is live even though there’s nothing happening yet. There’s also music during this “pre-roll”. I’ll talk about music and sound later).
BRB
I’ll put this scene on if I need to step away from the stream for a moment to use the bathroom or whatever. I added a sound to it as well, which I think is kind of funny - when I switch to the scene, it’ll play the “be right back” sound - I’m not sure where this sound is from but I think it’s a meme :)
This scene also has a gif so that people know the stream is still alive.
Bye
Ending your stream is straightforward: you click the Stop Streaming button in OBS. Rather than cutting directly from Desktop to the stream being over, it’s nice to switch the video to a goodbye scene, so people know that you’re about to stop the broadcast.
For this, I drew a little goodbye picture on my iPad. I try to remember to put this on before I end the stream, but it’s easy to forget: there’s a lot to try to pack in right at the end! I try to talk right at the camera, thank people for stopping by, and recap the stream, but I also typically try to find a streamer to raid at the same time (Twitch’s term for sending your viewers to another stream when you’re ready to stop), which adds a bunch of extra mental overhead. All of this adds up to sometimes forgetting to toggle the “Bye” scene.

Video
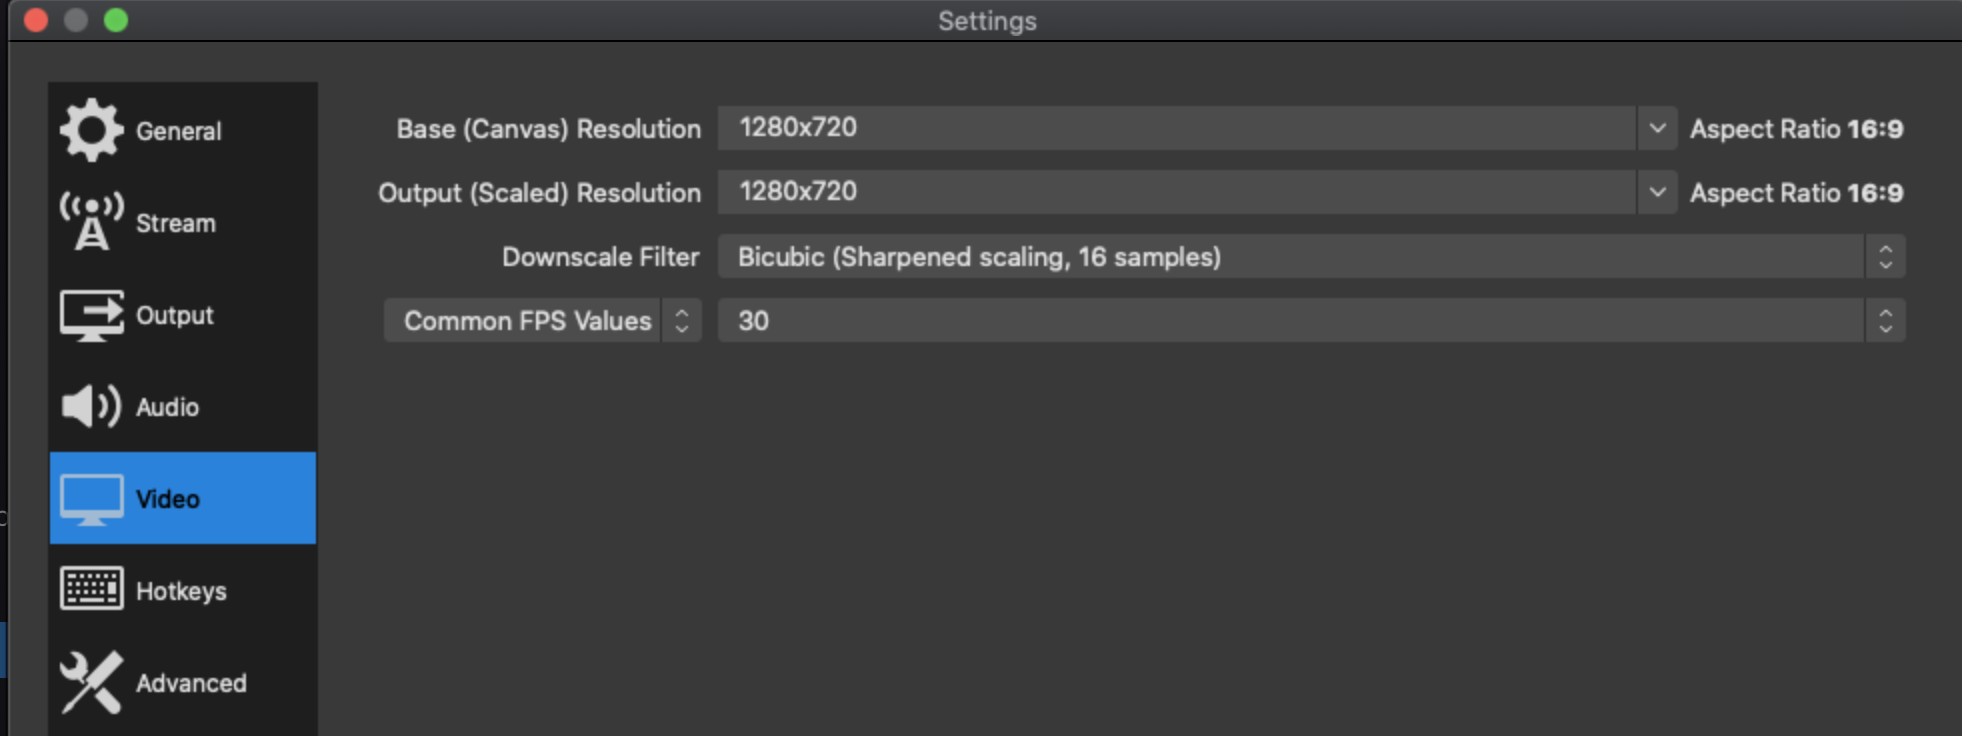
There’s a bunch of settings you’ll need to tweak in OBS, but probably the most important ones will be your Video and Output settings.
The Video settings control the Canvas and Output resolutions (the size of the stream canvas on your computer, and the resolution that OBS will send to Twitch). The bigger the output resolution, the more bandwidth you’ll need to stream, and the more bandwidth your viewers will need to watch. The most popular streamers get “quality options” from Twitch, which allows viewers to watch at a lower quality, but most streamers don’t get options - the viewers have to watch at the same resolution that the streamer streams at. And, if your canvas resolution differs from your output resolution, OBS will need to apply a downscaling filter, adding to the CPU load.
All of this to say, I set both resolutions to 720p! It seems like a good mix of bandwidth and quality to me.
The Output settings control the behavior of the encoder, and must be tuned to provide the right mix of quality and CPU use. Generally, the higher the bitrate, the better your stream will look, but the more network bandwidth and CPU OBS will consume. You’ll want to find a mix that works for you. Here’s what I use, but of course, YMMV and you should experiment:
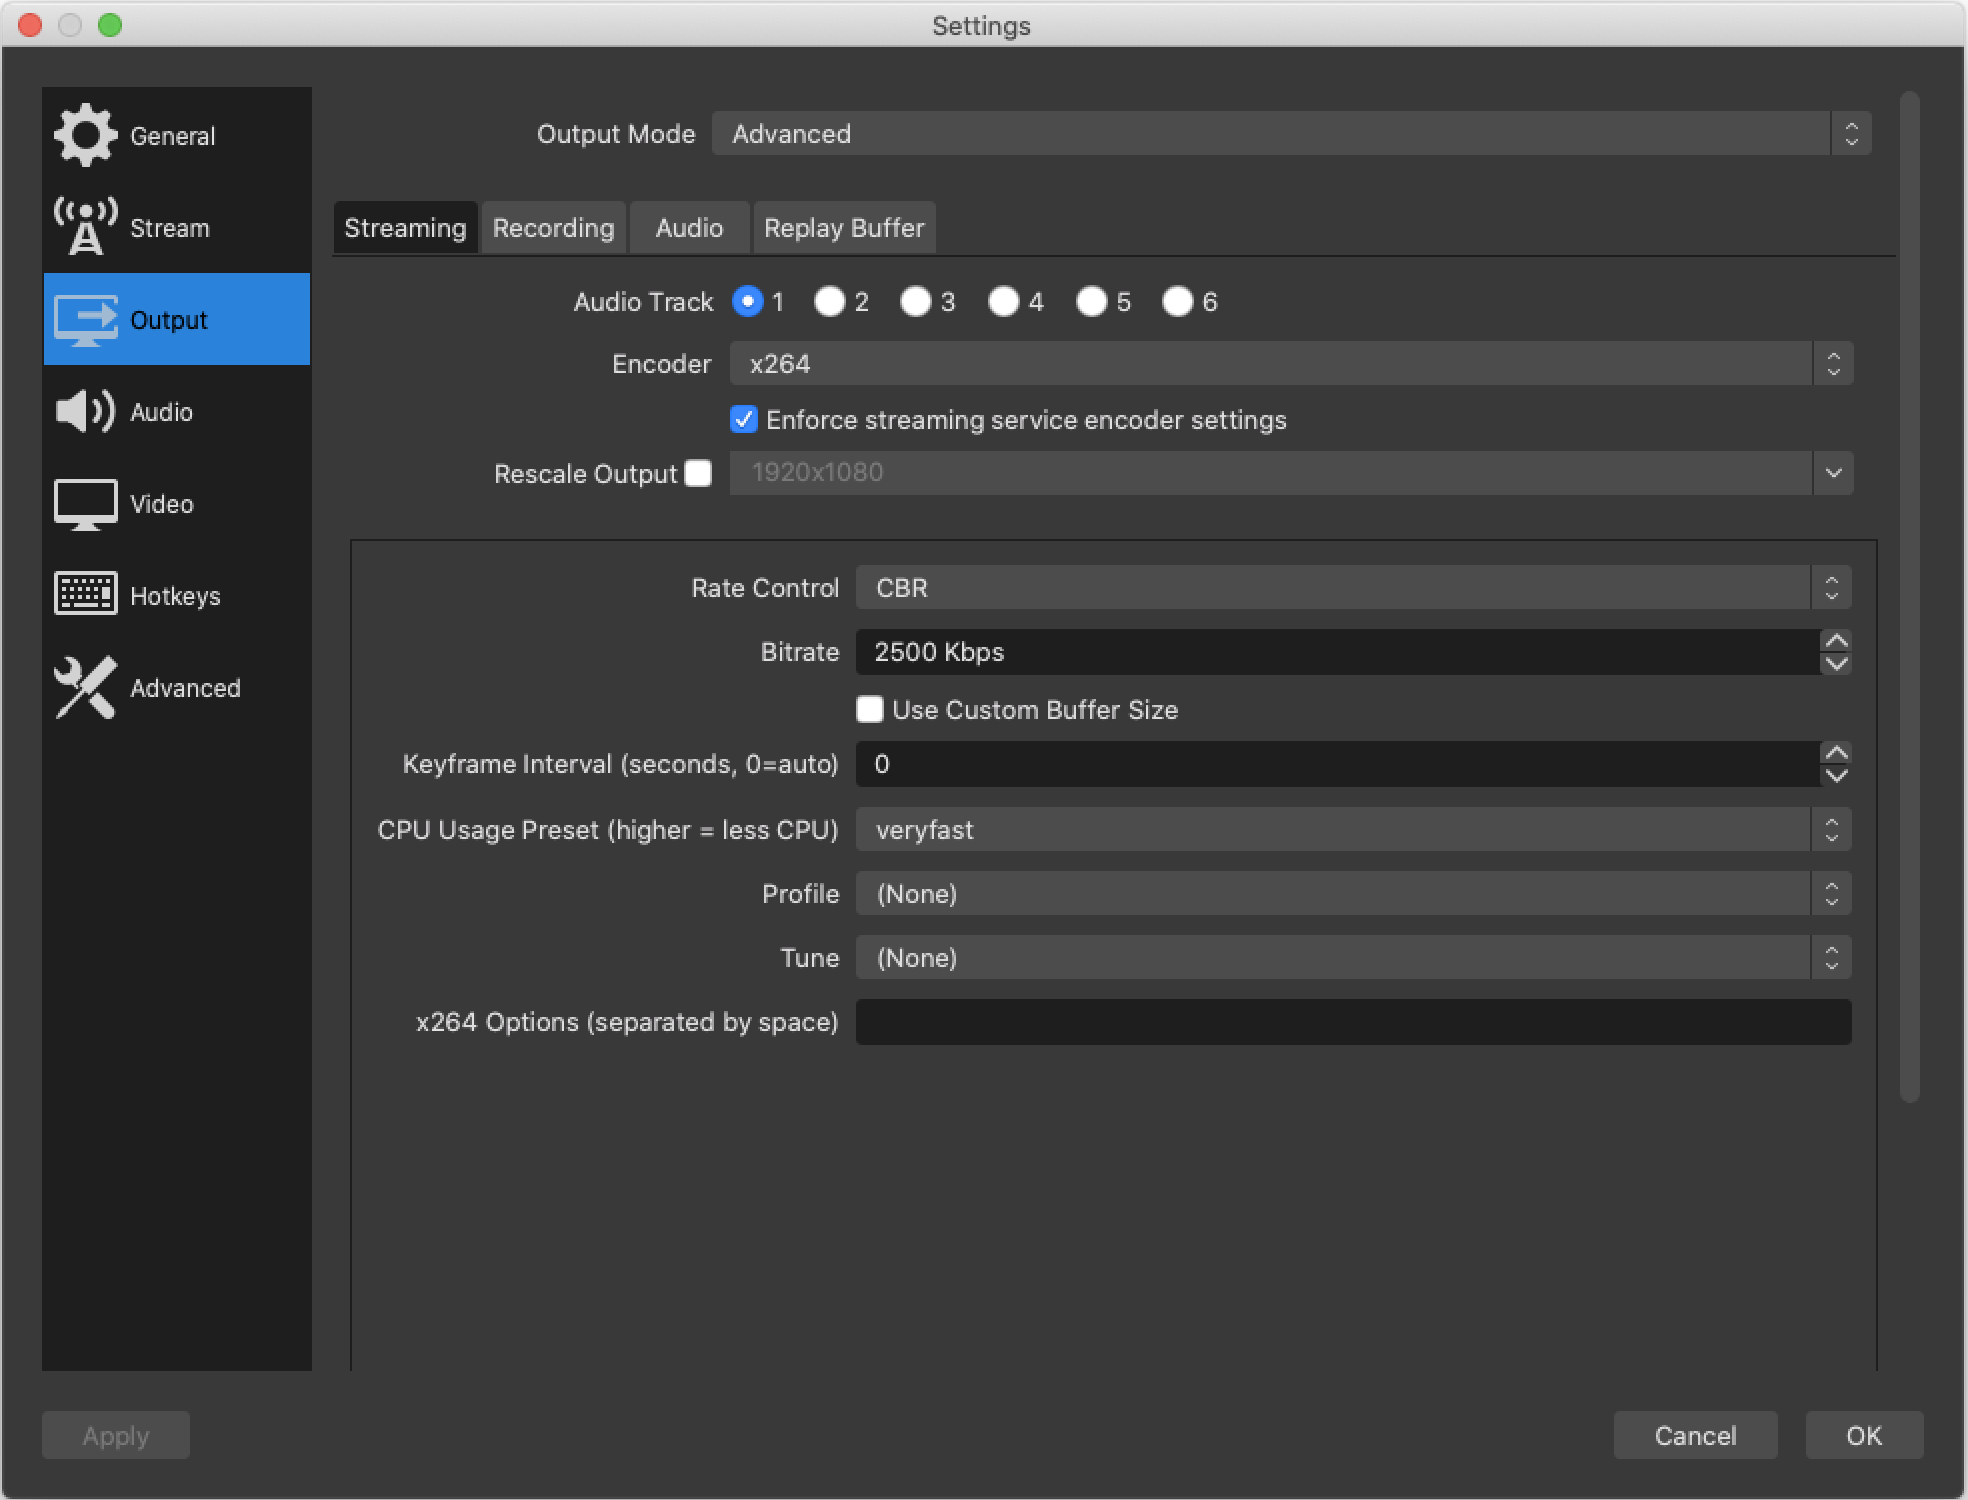
The best way to test this stuff is to record sample videos and examine them, as well as to use the Twitch Inspector, which gives you a modified Stream Key that you can configure OBS with. Once you start streaming with the modified key, you’ll be able to monitor your upload bandwidth and the bitrate that you can sustainably send to Twitch via the Inspector website, without having to actually go live.
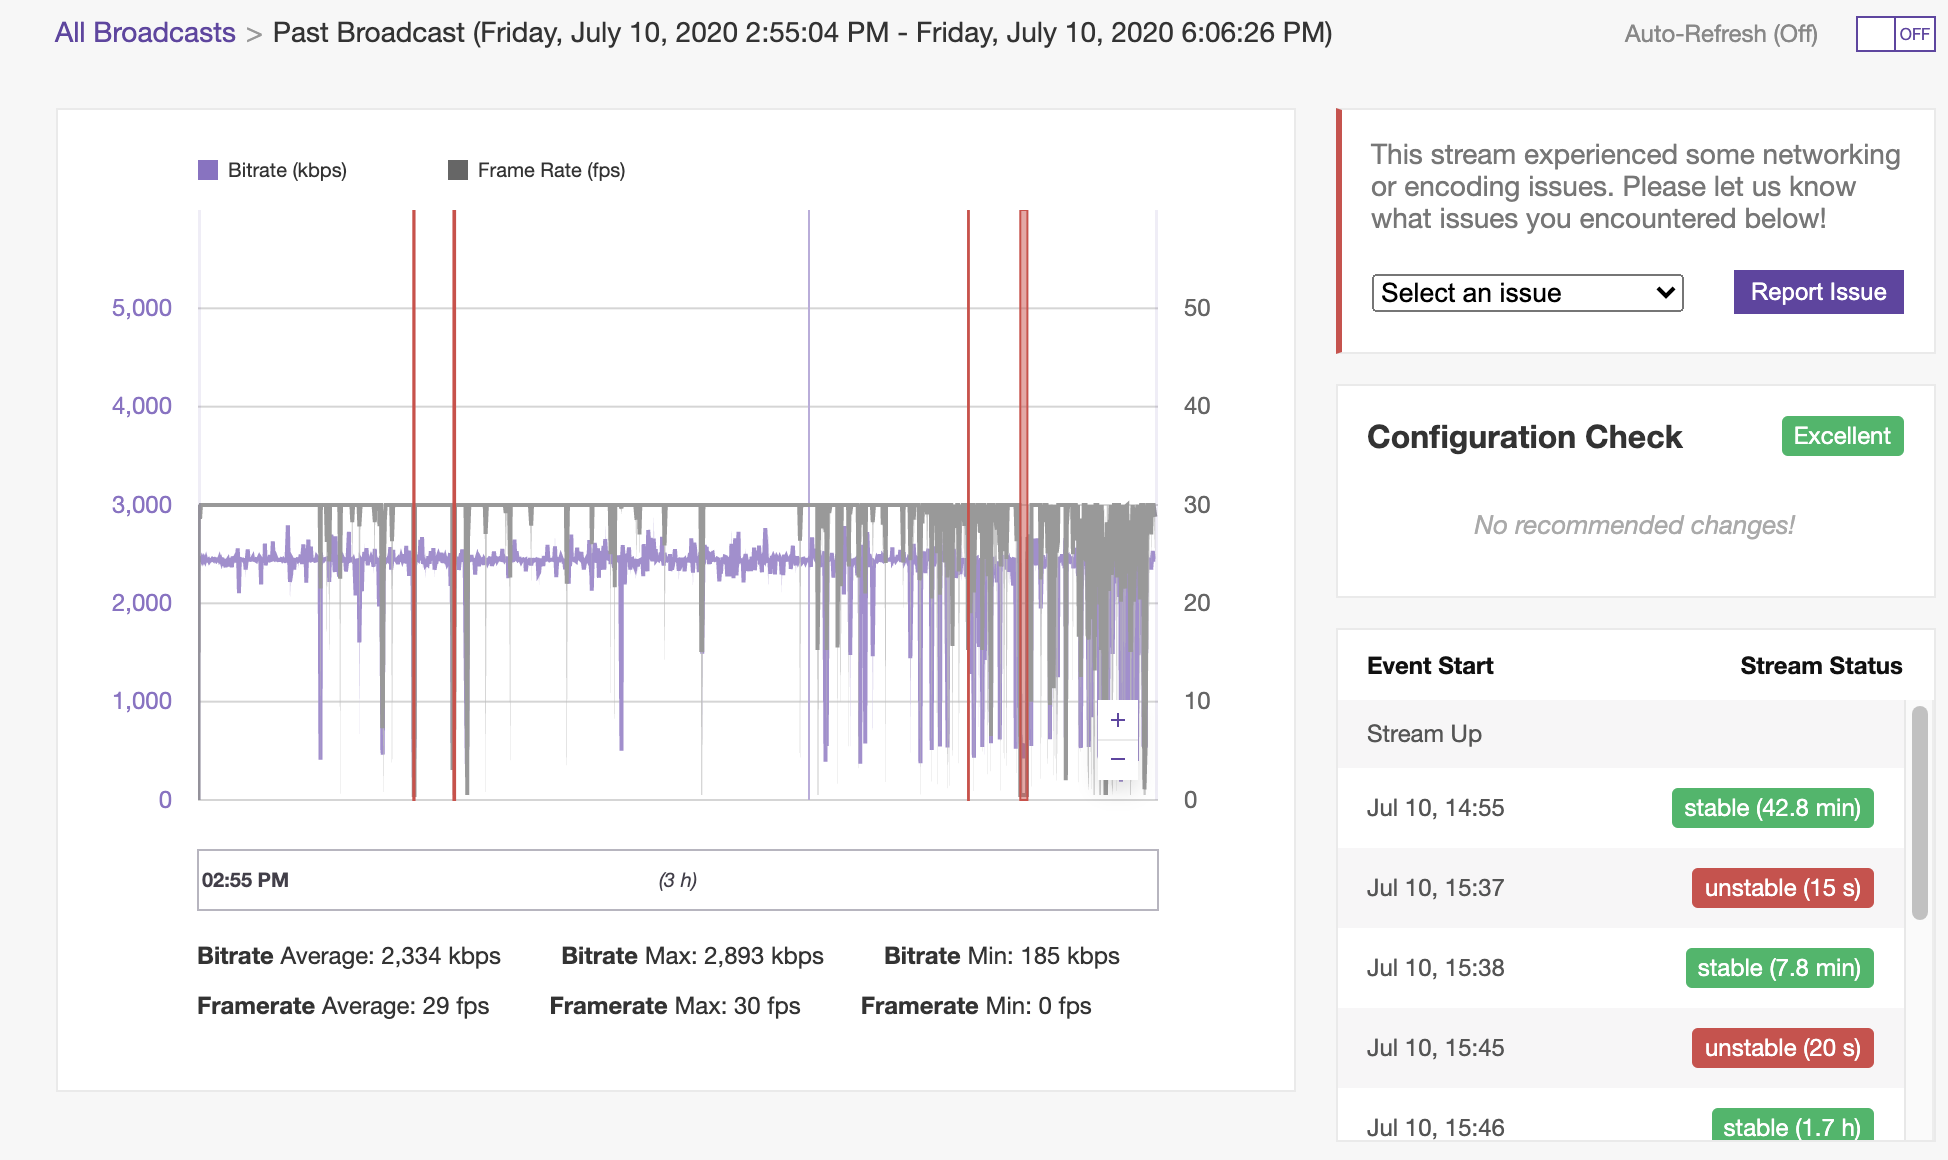
This graph is from a recent stream that I had to cut off due to internet issues, which I think were caused by the intense storm that was rolling through Brooklyn at that time. You can see there are several instabilities in the graph, and some “unstable” events. A good, stable stream will have zero or few blips in the graph.
One slight annoyance with the Inspector is that it only gives you your bitrate and bandwidth, in a graph: it doesn’t actually let you play the stream back to make sure it looks good. If you’re just getting started and really want to test out the pipeline end to end, you can set up a private or unlisted YouTube Live broadcast and stream to that. That will let you see your video during or after your test stream.
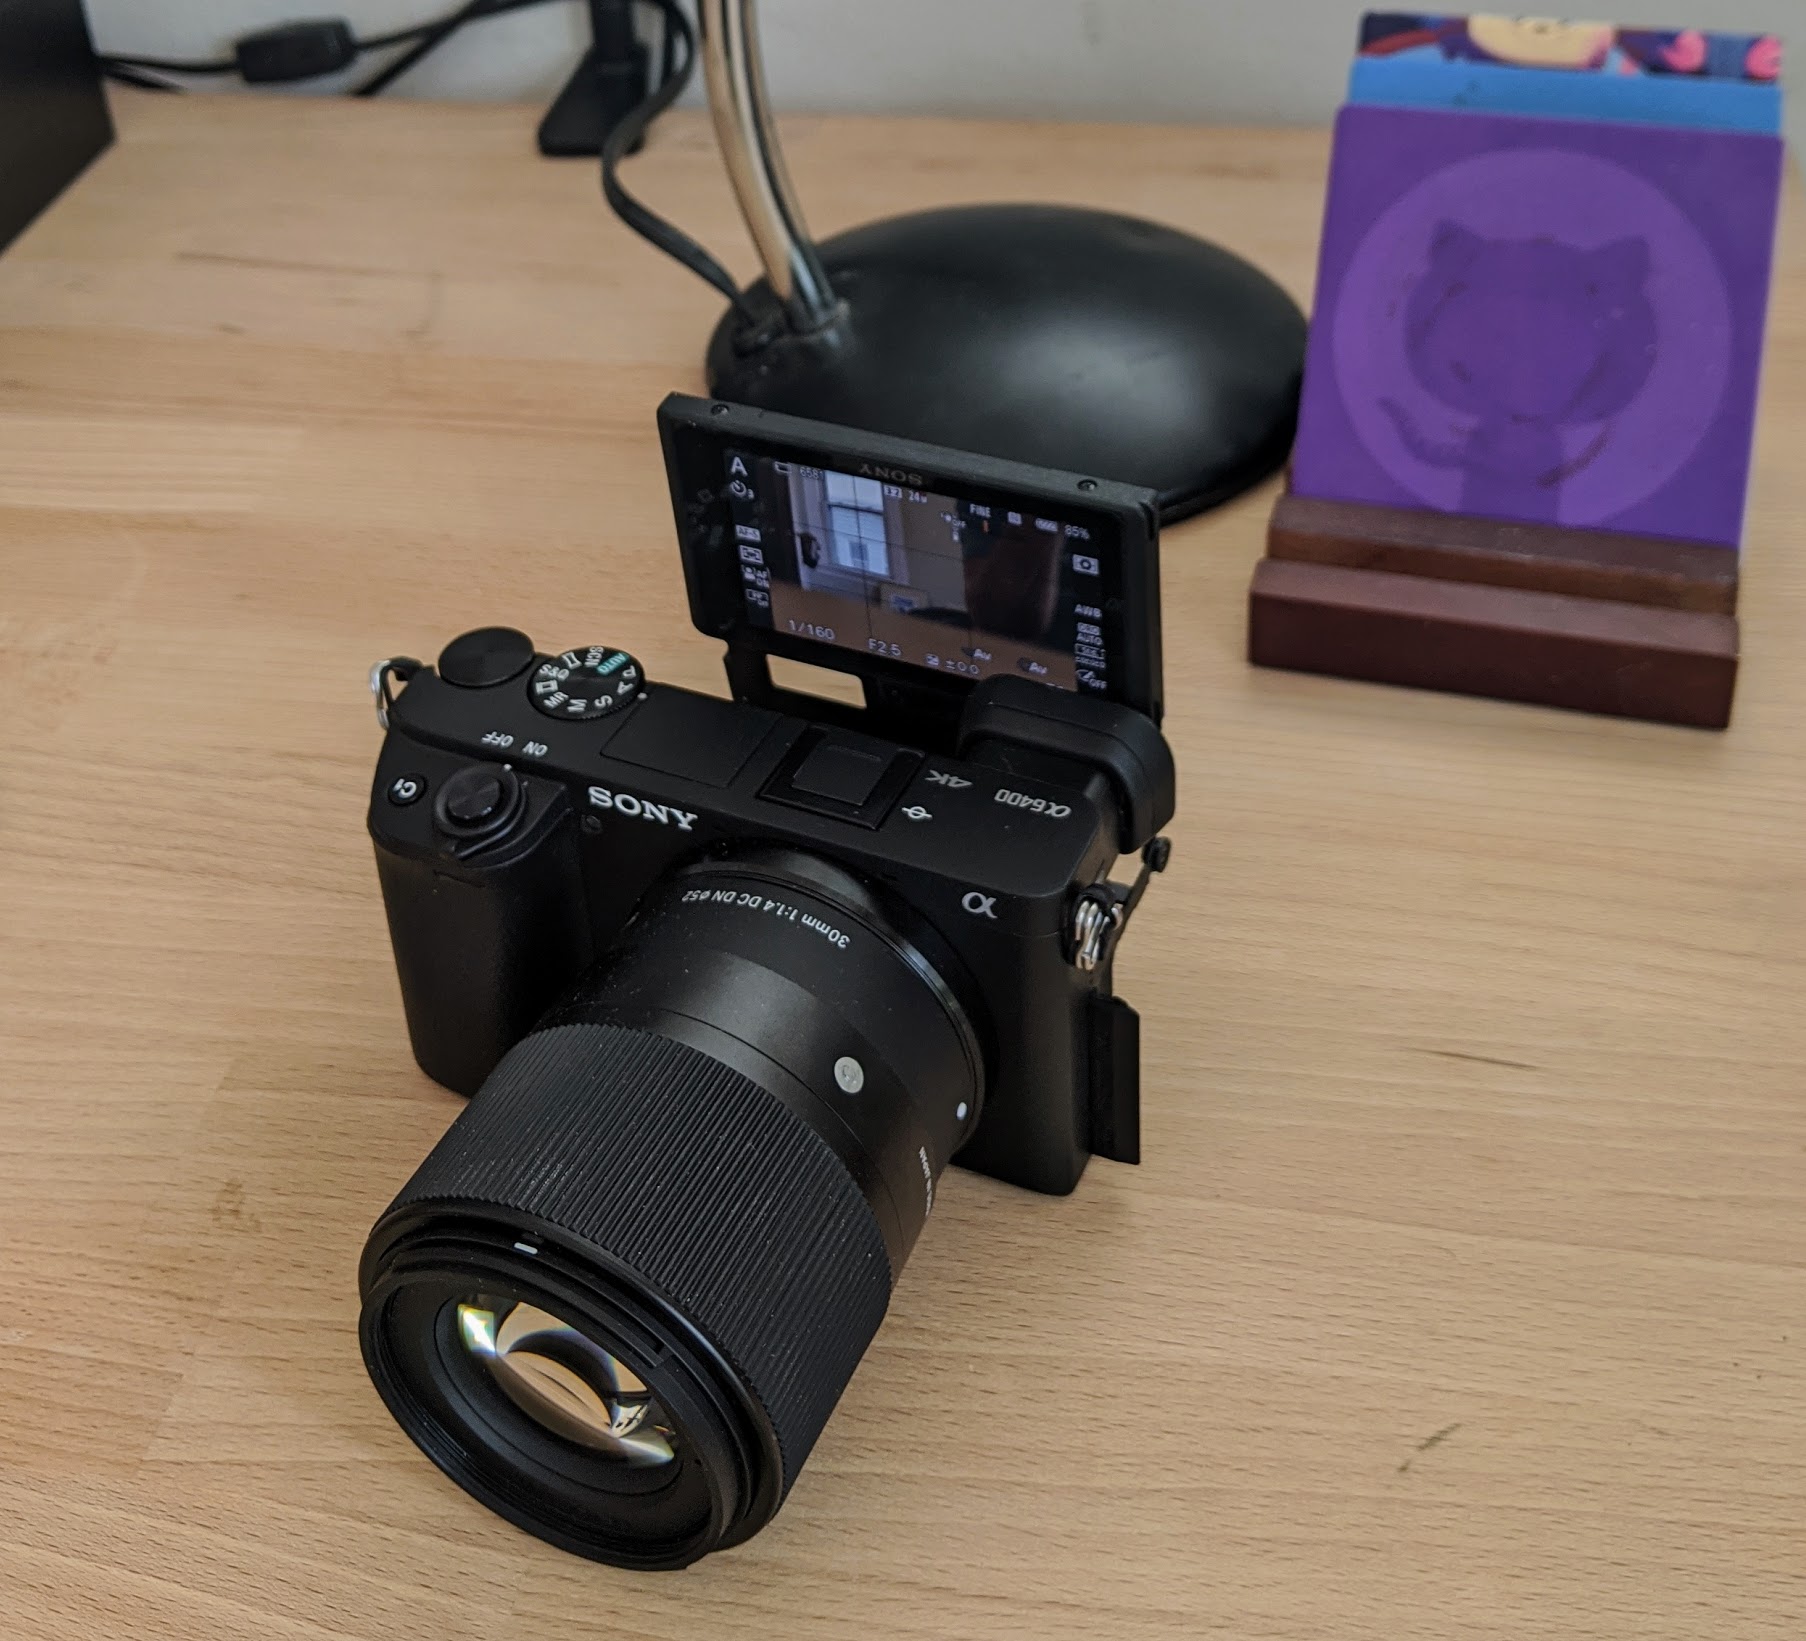
Camera
I use a Sony a6400 camera with a Sigma 30mm f/1.4 lens to capture my visage. You definitely don’t need such a high quality camera to get started streaming with, but if you’ve got one, you might as well use it! The quality will be immediately noticeable.
Whatever camera you use, you’ll probably want to make sure you have some nice light shining on your beautiful face! The easiest way to do this is to stream during the day: sunlight makes everyone look good. If you’re streaming at night, you’ll need to figure out lighting in a different way. I talk about the cheapo DIY softbox I use in my desk setup post.
Side note: if you’re not using a USB webcam or the camera on your laptop, you’ll need a capture card to convert your camera’s HDMI output into a video stream for OBS to use. I use the AVerMedia Live Gamer Portable 2 Plus, which while hideous and rather large, does the trick. It also has pass through HDMI, which gives me the option of capturing a game console if I ever decide to stream something that isn’t programming.
One thing to note about the capture card is that it does introduce some latency between what the camera sees and the output stream in OBS. To compensate for this, I added artificial latency to my microphone to match the capture card’s latency. I’ll talk about this later, in the audio section.
I started out with the Logitech C922, which is a fabulous, affordable webcam. After I upgraded to the fancier Sony, I figured I’d put the Logitech to good use by pointing it at my handsome keyboard and letting viewers see the soothing, soothing ASMR effect of my hands tapping keys during my stream.
I like this, but it adds a little bit of extra mental load to make sure that I remember to not type passwords! I’ve leaked some unimportant passwords a couple of times this way (though not sure if anyone has taken the time to try to figure them out from the video), so hopefully at this point I’ve learned my lesson.
Audio
Sound is the other really important component of a stream, besides the video. Your viewers want to hear your silky smooth voice, and depending on what you’re trying to do on stream, might also want to hear the sound from whatever you’re doing on your computer. I also like to include a low volume of background music on my stream, to ease the transition to silence if I have to take some moments to think about what I’m doing. It’s also a common touch to add a sound to your stream alerts.
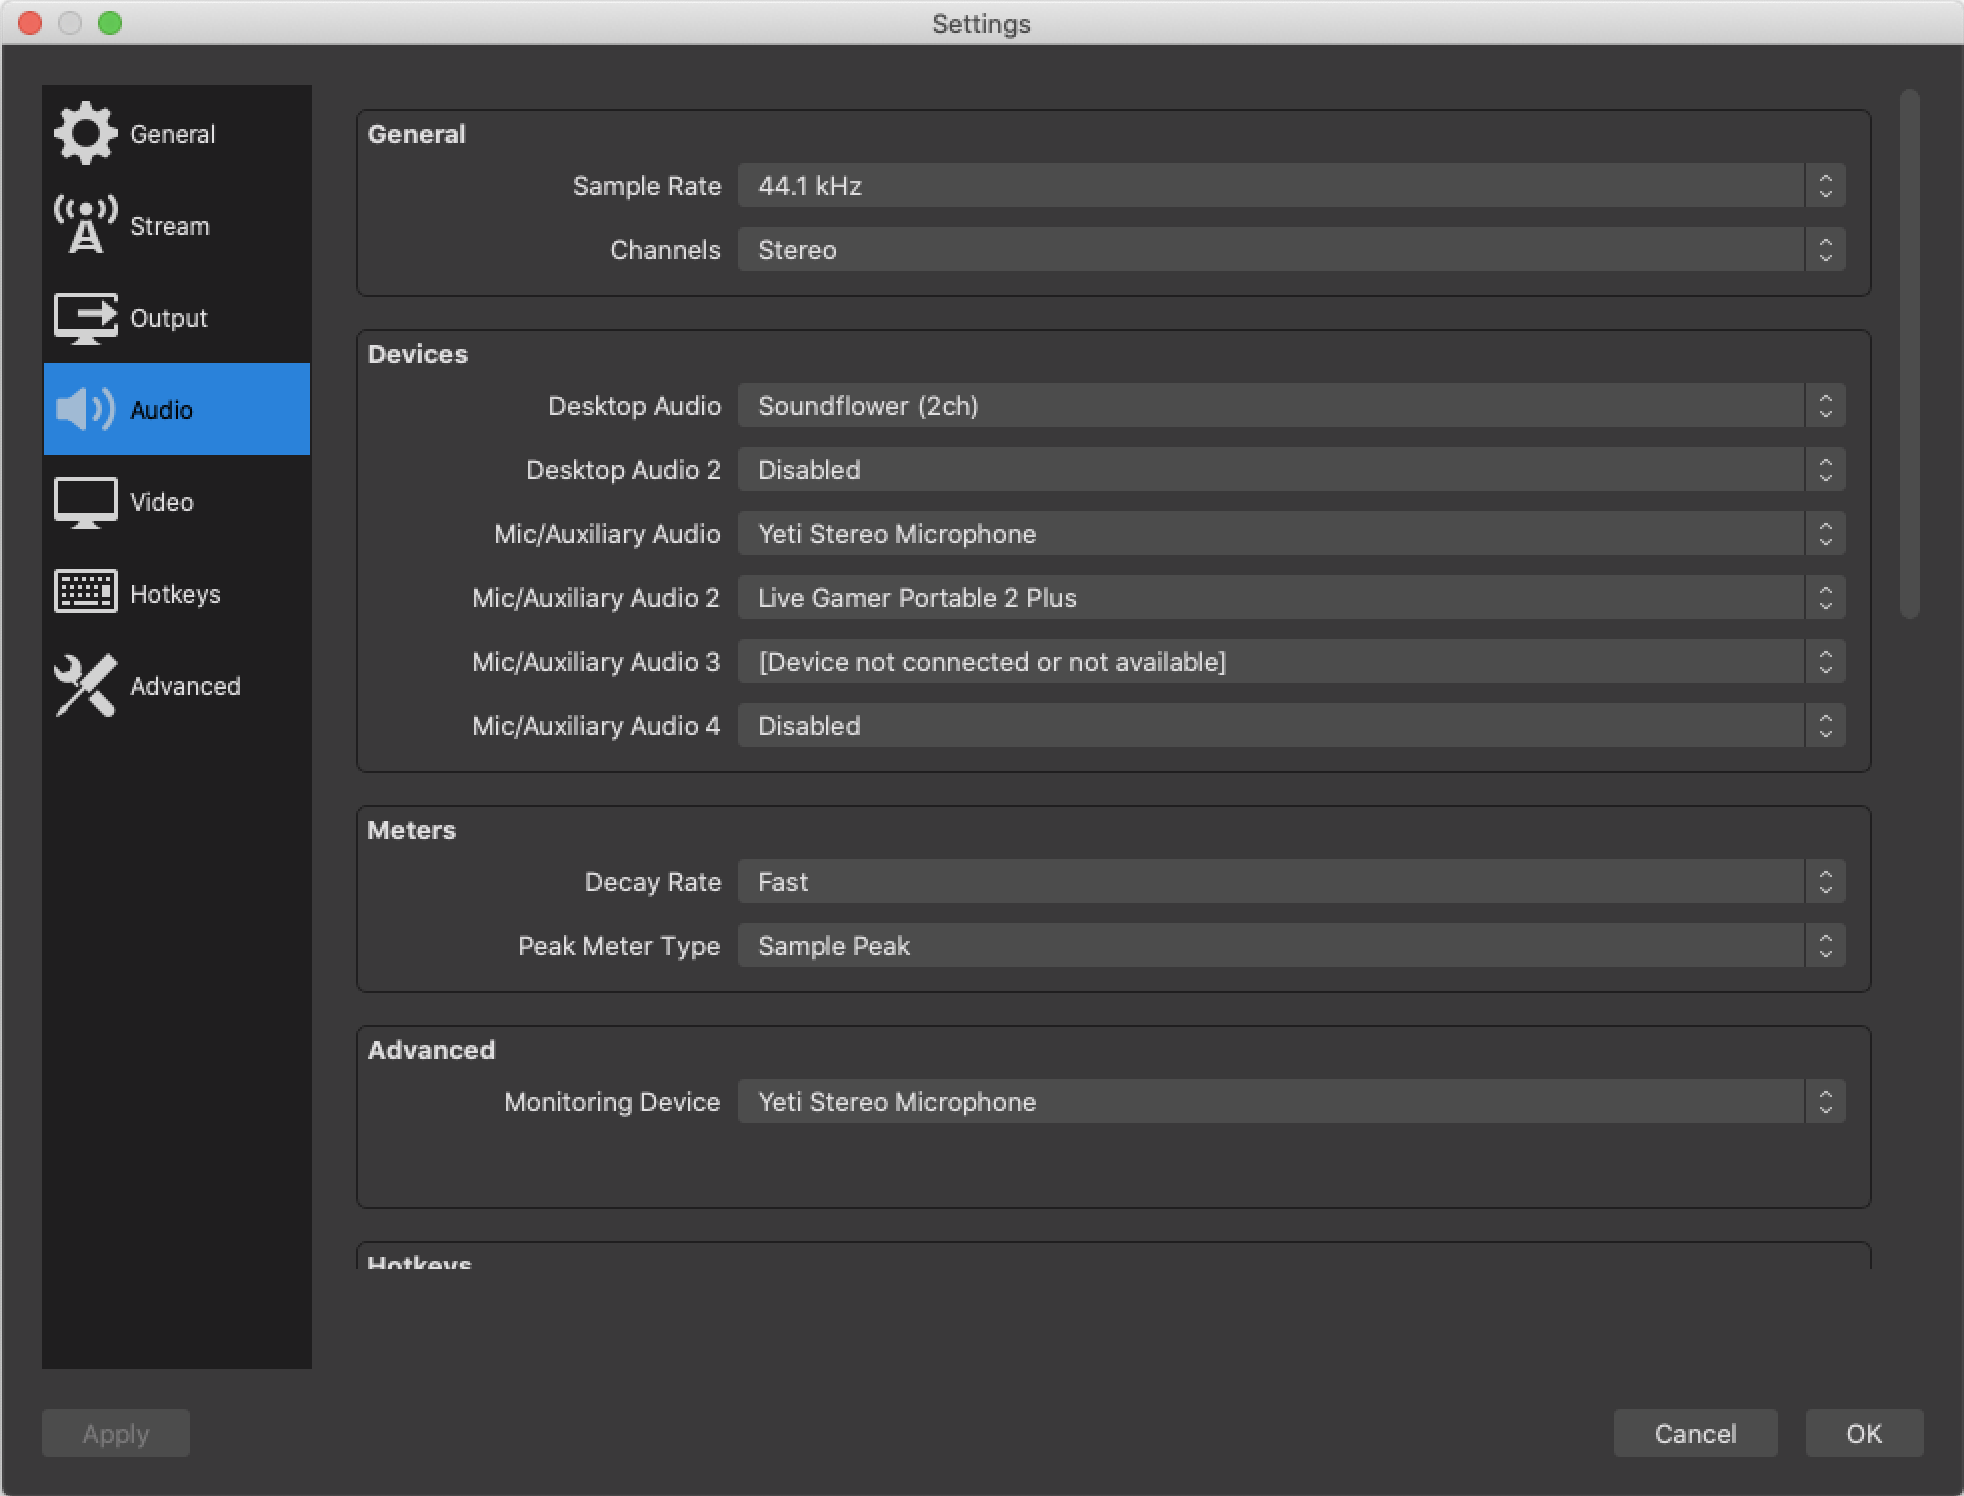
OBS has several places to configure audio, but you’ll want to start with adding your microphone (Yeti Stereo Microphone, in my case) to the Mic/Aux dropdown in Audio settings:
Microphone
I use a Blue Yeti mic, which is a popular choice and a good mix of price and quality. I have it mounted to my desk with a boom arm, so I can bring the microphone close to my face without it getting in the way of my keyboard, and a shock absorber and pop filter to avoid distracting plosive noises and vibrations from any furious typing or desk bumps that might ensue. I wrote about this more in my desk setup post.
The advantage of bringing the mic close to your face with a boom is that it allows you to lower the gain on the microphone to avoid noises that are not your voice. Even with a low gain, though, the microphone is very sensitive, and it’ll pick up noises like fans, air conditioners, or your partner’s phone calls. OBS has several filters that you can apply to your Microphone input to help suppress this background noise, like Compressor, Expander, Limiter, and Noise Suppression. There’s a lot of discussion about this on the OBS forums and around the web that I won’t rehash, but after copious testing with different settings and levels of background noise, I’ve come to the conclusion that the best filter for me is the Noise Suppression filter at -20 dB. This will almost certainly be different for you - try things out!
Syncing Audio to Video
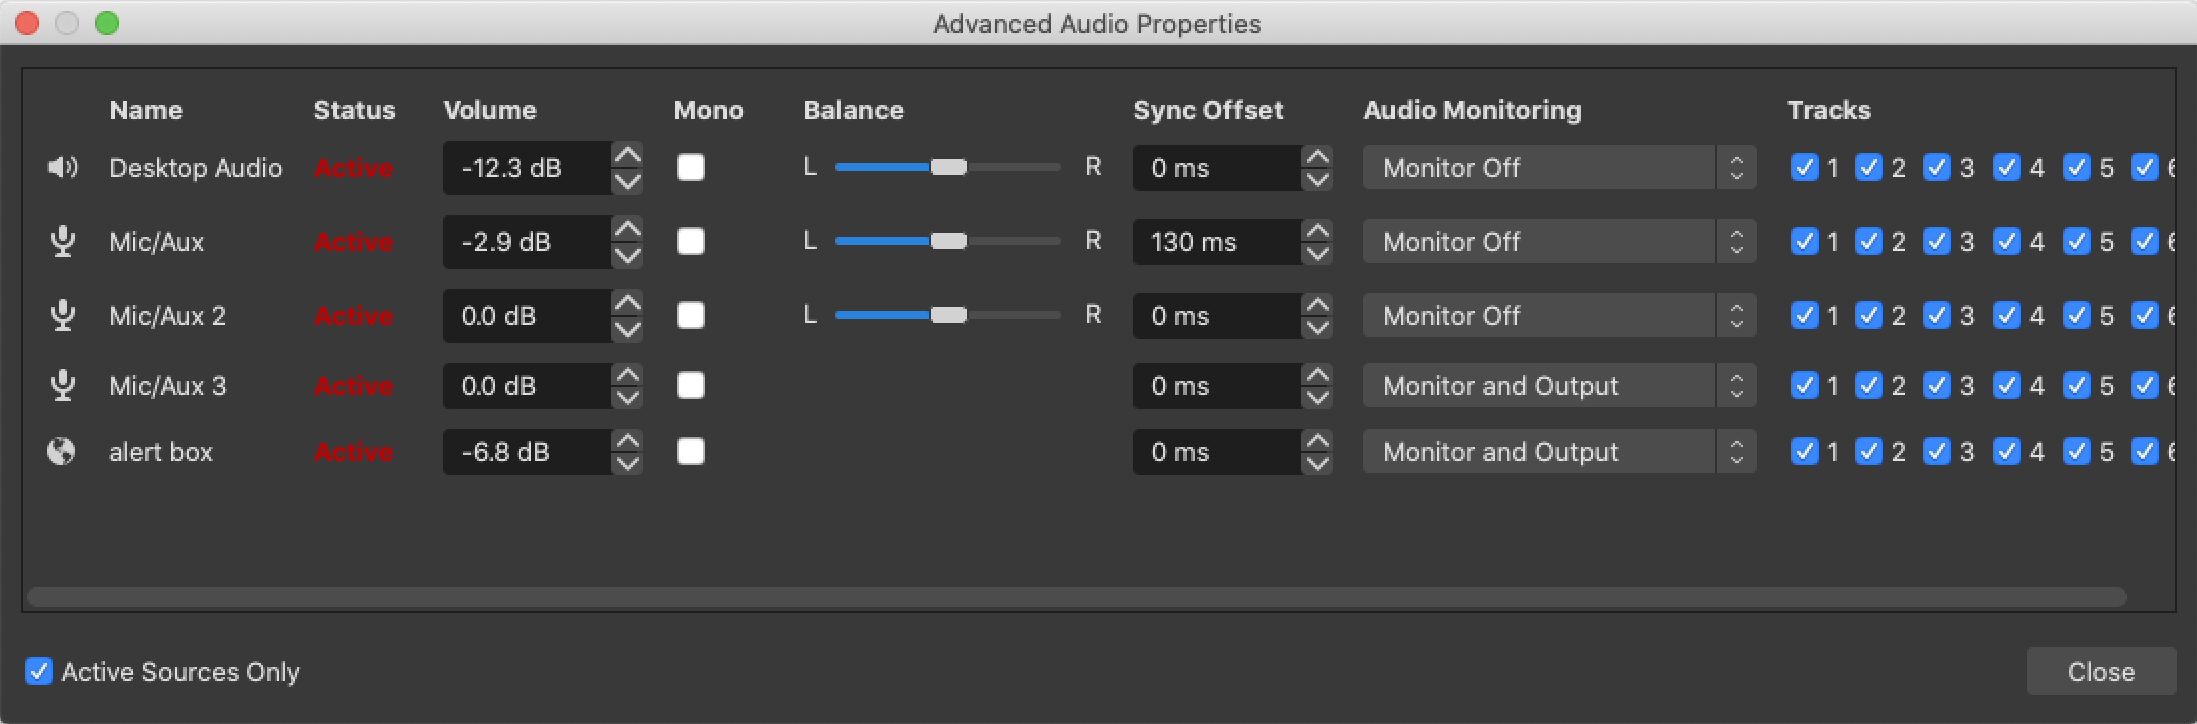
When you test your stream out, if you notice that there’s an issue with the synchronization between your mouth moving in your video and the sound of your speech, you can tweak that in the Advanced Audio Properties settings in OBS. I had to add 130ms delay from my microphone to compensate for the latency of the capture card that I use for my webcam - of course, this will vary depending on your setup.
The way that I test this is by using the Start Recording feature in OBS, and recording myself clapping several times. Then, I open the video in VLC and play it back in slow motion, trying to line up the sharp sound of the clap with the image of my hands hitting each other. It’s kind of hard!
Now that I think about it, this must be why movie producers use those iconic clapboards and not their hands - it’s probably much easier to see exactly when the two halves of the clapboard hit each other than two hands.
Desktop Sound Capture
I have to admit that getting desktop capture sound right on OBS on Mac is kind of a pain. I use SoundFlower, which is an open source kernel extension that allows you to set your audio output to a device that programs can then use as an input source. This allows OBS to listen to all of your computer’s sound output.
In order to also listen to that same desktop sound, you’ll need to make an “aggregate device” in the Audio MIDI Setup program, and include both your headphones and the Soundflower device. Then, you’ll set your computer’s output device to that new aggregate device you’ve created.
Alternatively, you can shell out the $99 for Loopback from Rogue Amoeba, which does all of this (and more) in a much easier way.
Anyway, once you get this all set up, you’ll want to add your Soundflower or Loopback output device as your Desktop Audio device.
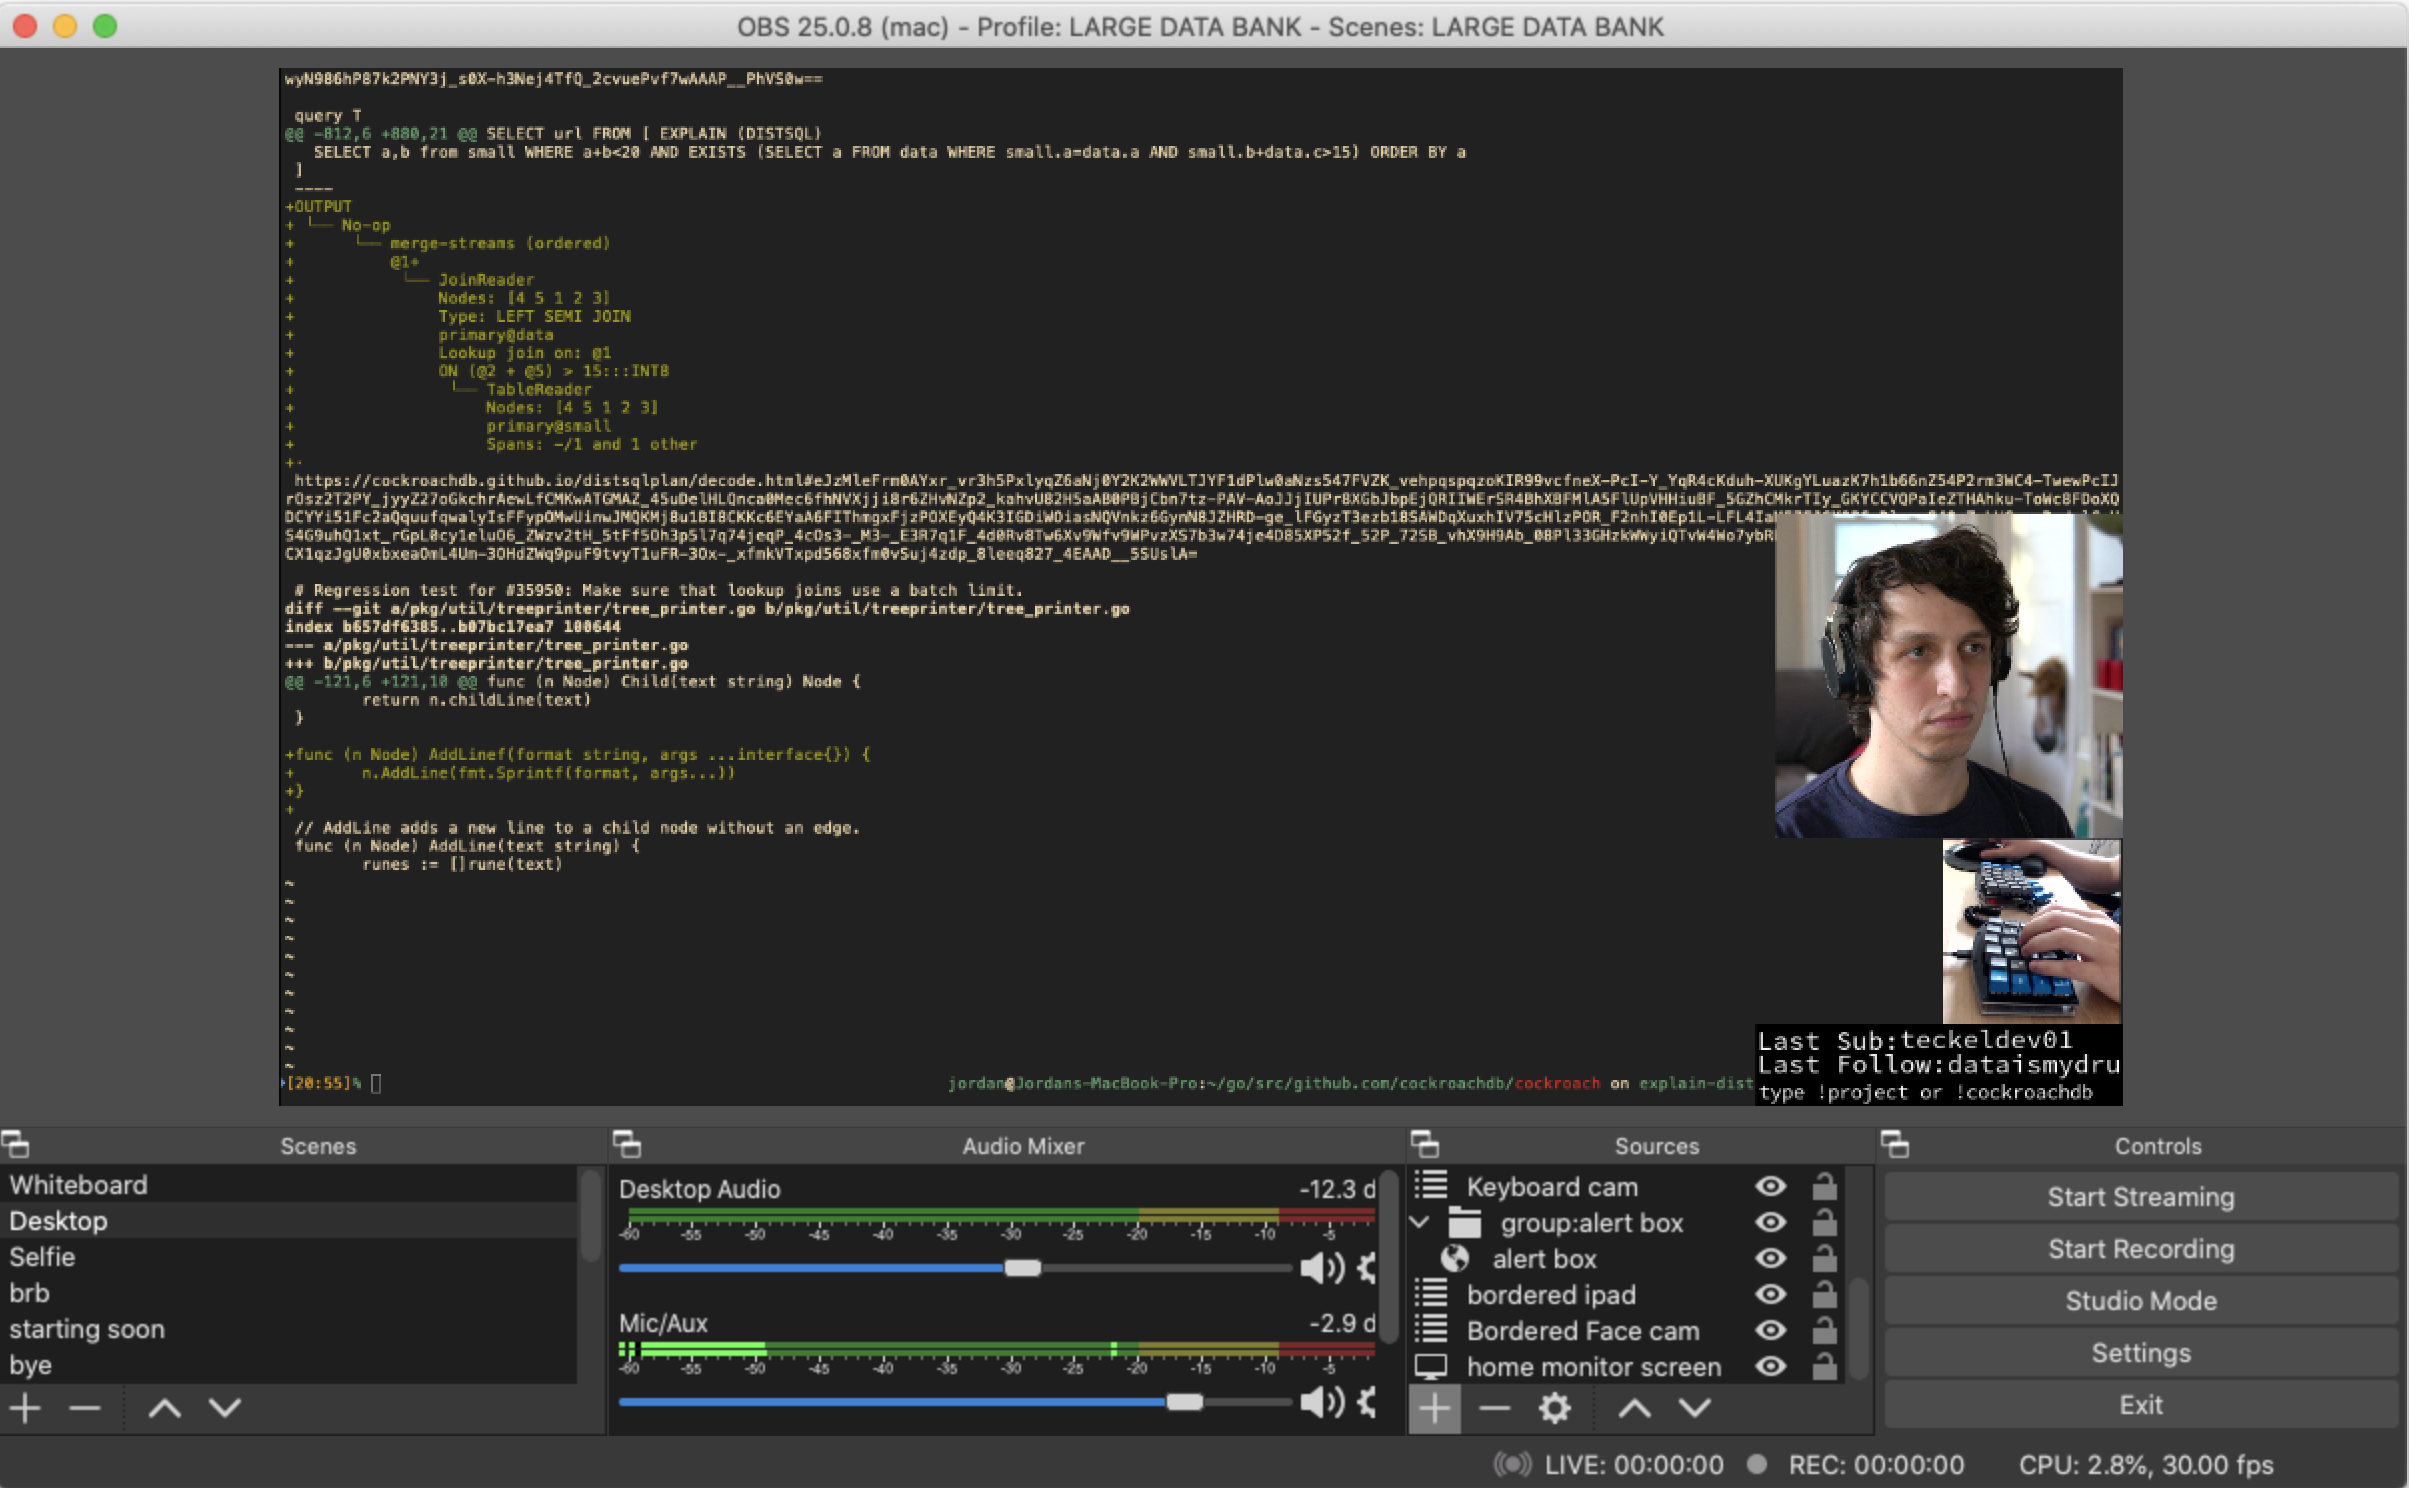
Now, you’ll be able to see the levels for both of these devices in the Audio Mixer at the bottom of your stream and adjust them on the fly.
Streaming to Twitch (finally)
Okay, you’ve tweaked OBS to your liking, set up your webcam and microphone, and created some scenes. Now, how do you actually go ahead and start streaming?
First things first, you’ll need to create your Twitch account, if you don’t have one already. The Twitch documentation is quite good, according to my expert tech writer colleague Amruta, so you should check out their docs for more info on that.
Once you’ve got your account set up, you’ll need to find your Stream Key on the Twitch website and enter it into OBS’s Stream settings.
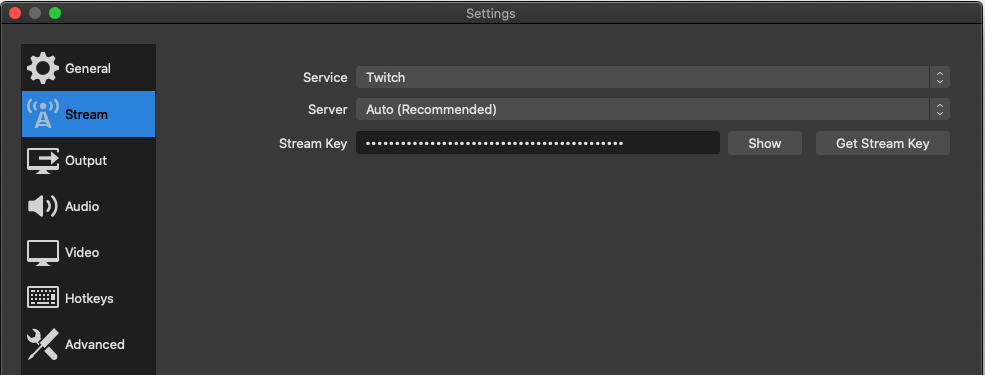
Once that’s done, all you have to do to start your live stream is to take a deep breath, smile at the camera, and hit the Start Streaming button in OBS. That’s it: now you’re live! Have fun.
Stream Alerts
Stream alerts are a fun way of encouraging people to follow or subscribe to your channel. When someone follows, subscribes, gifts a sub, raids or hosts your stream, or sends bits, having a stream alert configured will play a gif, a sound, and display the name of the person who performed the action along with the thing that they did.
I use the StreamLabs Alert Box for my stream alerts. It’s very easy to use, and free. Once you’ve configured the alert box on the StreamLabs website, you add it to your stream as a Browser source. When somebody interacts with your stream, StreamLabs will send the alert to the webpage that the source is pointing at, and it’ll do its thing. This is less confusing than it sounds, and StreamLabs has pretty good instructions on their site for how to set it up.
My follower alert looks like this (on stream, the blue background is transparent):
You can have a lot of fun with these! I picked a bunch of different gifs for each alert type, and to further personalize things, I found some movie quotes on QuoDB where people say something related to data banks, found clips of them online, and created mp3s to play when people subscribe. You can also have StreamLabs play a random mp3 from a set, to keep things fresh as people follow or sub.
Sound in Stream Alerts
Besides just being exciting for your viewers, stream alerts also serve another purpose: to make a noise so that you know to react to the exciting follow, sub or raid that just came your way! There’s just one problem, though, which is that you need to make the alert play both to your stream and into your headphones, without playing twice.
This is troublesome if you’re doing desktop audio capture! By default, the Browser source will play audio directly into the stream’s mix, and not output locally. This sounds good for your viewers, but not for you, the streamer. For you to be able to hear the alert yourself while streaming, you’ll need to check the “Control Audio via OBS” box in the Browser source, and then set the Audio Monitoring dropdown in Advanced Audio Properties to “Monitor and Output” (you can see this in action in the audio section.
This will output both to your stream and to your configured Monitor audio out. Careful, though - if your monitor audio out is the same audio output that’s getting captured by Soundflower or Loopback, your viewers will hear a doubled sound. To avoid this, make sure your Monitoring device is set to your headphones in OBS’s Audio Settings.
Channel setup
Once you’ve gotten your stream going, you’ll probably want to use Twitch’s tools to fill out your page to help give your stream a unique look and branding, and to help viewers understand what your stream is about. There are a several things to take care of here, and just like the rest of this setup, you’ll probably want to start simple here and enhance it over time as you see fit.
Stream Category and Tags
Twitch gives every stream an opportunity to list its category. Since Twitch started as and is still primarily a gaming website, most of the categories are individual games.
There are several non-gaming categories. The one that live coders use is called Science & Technology, so I use that as well. The category is also a great way of finding other programming streamers to watch, get inspired by, or learn from.
Twitch also allows you to give your stream tags, which are a further way to aid stream discovery and help viewers know what your stream is about. I always tag my stream with the Programming, Educational, Engineering, Software Development, and English tags.
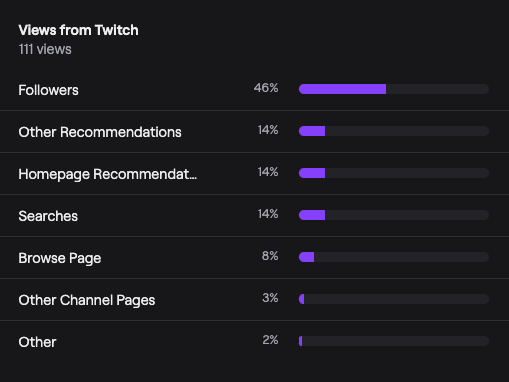
It’s somewhat hard to tell where viewers come from via Twitch’s analytics, but for reference, here’s the viewer breakdown from one of my recent streams. I believe the recommendations and browse page views probably came up because of my stream’s categories and tags.
Panels
Panels are Twitch’s way of giving your channel an “about” section. Each panel can have an image and some text. It’s a fairly annoying abstraction, to be honest: each panel image has to be a fixed size, and you don’t have that much control of how they’re all laid out.
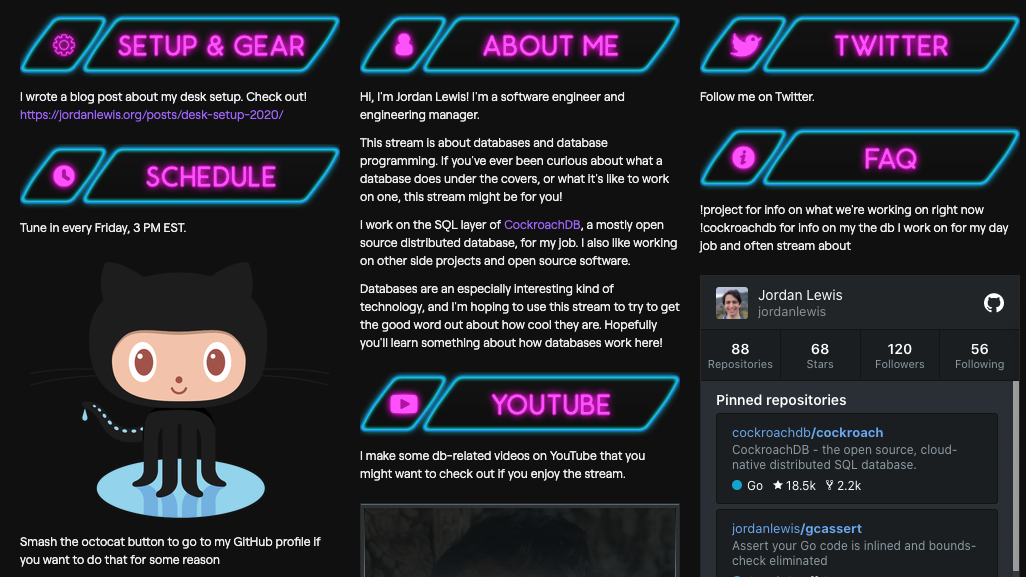
You can go text only, but most streams have some images to give the stream a unified look and feel. I’d eventually like to pay an artist to make some themed panels and emotes for me, but for now I found some free panel images on Behance that I liked from someone named Anibal Alvarez. Thanks, Anibal!
Emotes
You can add custom emotes for your subscribers to use in any chat on Twitch if you become a Twitch Affiliate. Emotes are the lingua franca of expressing feelings on Twitch, and a great way of demonstrating your support for a channel.
A lot of people like to commission themed emotes for their channels from an artist. I’d like to do that at some point, but until then, I’ve uploaded a funny picture of myself that someone added to my work Slack in the image of the Ancient Aliens guy. See the resemblance?

Banner image
There’s also a slot for a banner image on Twitch, which is yet another asset that you’ll probably want to generate to avoid the default banner look, which is your Twitch name laid out in a repeating pattern on a plain, colored background.
I used Preview.app to make mine, and the result is predictably amateur. I really want to replace this image soon.
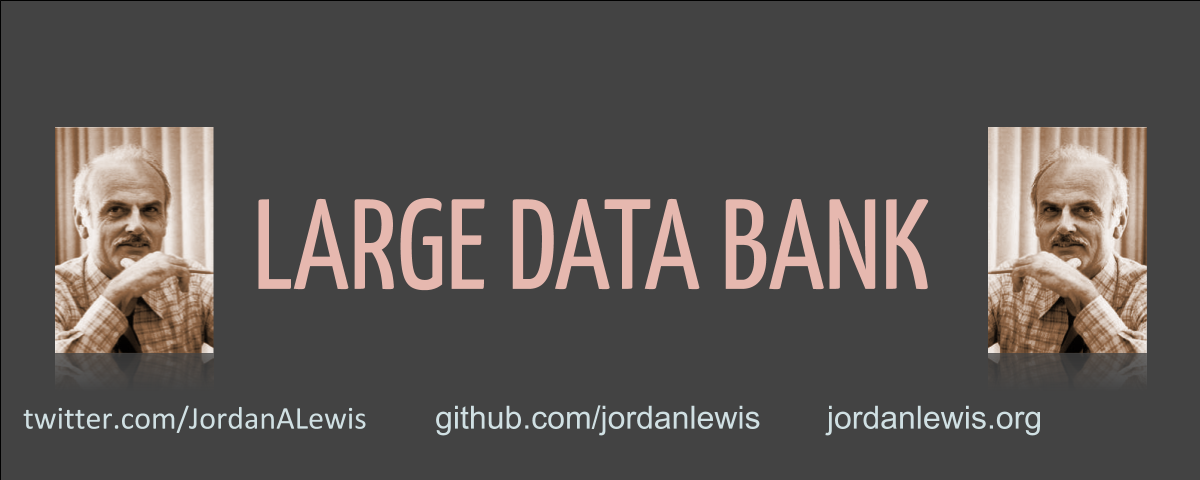
If you’ve made it this far in the post, and can figure out who the person in the banner is and how he relates to the title of my stream, congratulations! You are a nerd.
Saving Videos
One other important thing to note is that, by default, Twitch will not archive your stream as videos! You need to turn this setting on. It’s located in the Channel settings page of the Creator Dashboard.

Once you’ve enabled this setting, the video from your stream will be saved on Twitch’s servers for a few weeks. Each video has a handy dandy Export button, which allows you to permanently save your videos on YouTube (or download them if you want to do that for some reason). I export all of my videos to YouTube, trim out the intro and outro, and add them to a playlist for archival purposes.
You end up with a lot of YouTube content quickly with this method, and I’m not exactly sure whether it’s super useful to save the hours and hours of content that you create streaming raw to YouTube, but most of my stream videos get several views over time so I imagine somebody must find them useful.
Chatbot
Once your stream starts accumulating viewers, you’ll probably start to notice that there are some frequently asked questions that new viewers have that start to get tiresome to answer over and over again. Most channels have a chatbot set up with commands that you or viewers can type to get the answer to these FAQs.
On my channel, people love to ask what my current project is, what kind of
keyboard I have (I’m kind of asking for this one because I have a webcam
pointing at it all the time), and what my editor is and what color scheme it
uses. So, I have commands for all of these: you can type !project,
!keyboard, !editor, or !theme into the chat and the bot will respond with
the answer.
There are lots of Twitch bots out there. I like to use Nightbot, which has a good mix of features and is free and very easy to use. People love to make their own Twitch bots as well (I notice that it’s one of the most common projects that people do on their programming channels, actually), but I haven’t needed anything more fancy than what Nightbot provides.
Becoming a Twitch Affiliate
Twitch has an Affiliate program that you can apply for if your channel hits certain viewership and followership metrics. Becoming an Affiliate unlocks several features for your stream, most signifiantly allowing viewers to subscribe to your channel for a monthly fee, which grants them emotes to use in any chat room on Twitch, and the good feeling of supporting a streamer.
Affiliate streams also get a couple of other features for their streams, like Channel Points, which are a currency that you accumulate while watching the stream and can redeem for streamer-defined rewards. I haven’t tried playing around with Channel Points yet.
Getting to affiliate will require some work: you need to have 50 followers, an average of 3 concurrent viewers per stream, and 500 total broadcast minutes over at least 7 streams in the past 30 days. But, you can definitely do this if you put your mind to it!
It took me about 4 months to become a Twitch Affiliate. The hardest requirement for me was hitting 7 streams a month, which implies needing to stream more than once per week. When I started, I was streaming every Friday, and one stream per week is already quite a bit of mental effort! I added a Sunday stream as well, basically just so I could hit affiliate, but doing it twice a week adds up in time and energy for sure.
I wasn’t expecting this from the outset, but I found that seeing my friends, colleagues, and random strangers subscribe to me in support of my stream is a really wonderful feeling! It motivates me to try hard to make a fun stream every week.
Shoutouts
I want to shout out @noopkat for the awesome post about her streaming setup as well. It’s what helped me get started in Februrary and is another fantastic resource for getting started streaming programming on Twitch.
Thanks to the other streamers who I’ve collaborated with while creating this setup: OneTrueCaptain, jarsonmar, mdlayher, its_jay_phillz, occupy_paul_st, and sartak.
Thanks so much to everyone who has joined the stream to watch, chat, follow, jeer, or subscribe to my channel: it’s a great motivator and your support means a lot! It obviously wouldn’t be fun without you.
Special thanks to subscribers:
- Arjun Narayan
- Huey Park
- Jayson Phillips
- Justin Jaffray
- Matt Layher
- gatedlol
- lithiumx900
- nsielecki
- pandawine
- shakeelmm
Thanks to Amruta, Charlie, Justin, Paul, and Sean for reviewing this post.
Finally, thanks to Becca Rohrer for putting up with me yelling at the computer in our shared “office room” for hours and hours twice a week, especially during quarantine. This must be extremely annoying. Thank you for your gracious tolerance and support of this hobby of mine. I love you!